I was flipping through Owen Jones’s Grammar of Ornament a couple months ago, and my eye was caught by this handsome pattern I had not noticed before. This is Jones’s Plate XLII, in the chapter on designs from the Alhambra in Granada, Spain. He calls it, “Part of the ceiling of the Portico of the Court of the Fish pond.”
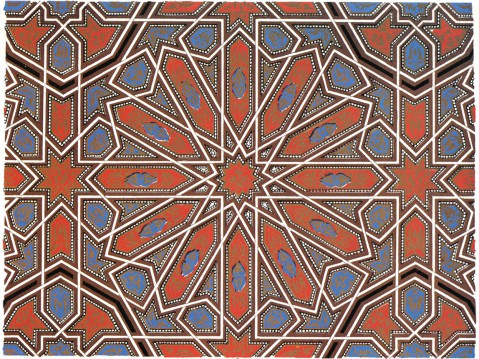
Since then I’ve kept out a clipboard with a compass and straightedge, and, in the small triangles of time after meals or before working on something else, I’ve slowly figured out how one might construct this. It’s less complicated than it looks at first, and at the same time, weirdly complex.
This post discusses how to construct this figure with compass and straightedge; the next post is about the mathematics of it.
To get a bigger picture of what the original is, take a look at this beautiful photograph at the David Wade archive of the actual ceiling:
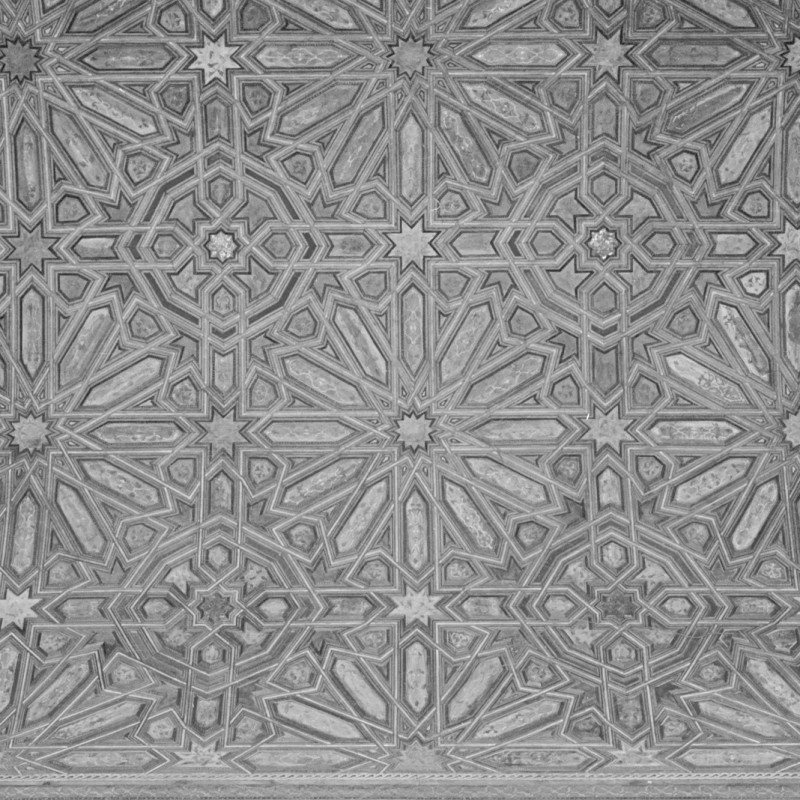
It turns out that it is constructed not on a flat surface, but on the inside of a barrel-vaulted ceiling. And it consists of multiple square repeat units, each holding a large 12-pointed star, arranged in regular rows and columns.
At Brian Wichmann’s Tiling Database (tilingserch.org), this pattern is called “Alhambra, Sala de la Barca,” and the notes say…
The shape of the ceiling of the Sala de la Barca is essentially cylindrical, with quarter spheres capping each end. Consequently the basically planar pattern has to be greatly modified where it covers the spherical surfaces at each end. The colours on the painted wooden ceiling are black, white, silver, brown and orange. The symmetry group of the tiling is *442 (p4m).
https://tilingsearch.mit.edu/HTML/data163/E755.html
And they have this rendering of the pattern, which shows that someone else has figured out how to construct it, even if they did not publish the method.

I found a photograph of the entire ceiling on the page for The Hall of the Boat at alhambragranada.org, so you can get a sense of the whole piece of work. The ceiling extends down a long, thin space.

The basic pattern, three full square repeat units with half a unit on each side, is rendered nine times down the main semi-cylindrical body of the vault. In the quarter-dome caps on each end, there is a single square repeat unit, with three half-units along the edge, and two triangular spaces cleverly filled in between these.
For now, I’m interested just on what’s going on with the regular square repeat units in the semi-cylindrical vault, the part we could actually unroll and lay flat. If you are interested in how they worked the pattern in the quarter-dome caps at each end, you can read more in Jay Bonner’s Islamic Geometric Patterns, p. 113 and p. 543.
Last, before going into the construction method, we should discuss where, exactly, this is in the Alhambra. We’ve seen it called “the ceiling of the Portico of the Court of the Fish pond,” “the ceiling of the Sala de la Barca” and the “Hall of the Boat.” Are these the same places?
A little research reveals that there is no Court of the Fish Pond, but there is a Court of the Myrtles that used to be called the Court of the Pond. At its northern end….
through a pointed arch of mocarabes, visitors may enter into the Hall of the Boat (Sala de la Barca). The origin of its name is the Arabic word baraka, which means blessing and which degenerated into the Spanish word barca, which means boat. This rectangular hall is 24 meters long and 4.35 meters wide, but was apparently smaller at the beginning and later extended by Mohammed V. A semicylindrical vault was destroyed by a fire in 1890 and it was replaced by a copy completed in 1964.
https://www.alhambradegranada.org/en/info/nasridpalaces/halloftheboat.asp
Interestingly, Jones’s drawing dates from before the 1890 fire, yet it differs slightly from what we see in photographs of the ceiling today. Tilingsearch.org cites Jones’s drawing as
Plate XLII+ (Alhambra, Sala de la Barca, Spain. Drawn incorrectly without a kink) from [jones]
I was a long way into constructing this figure before I found what I think is the “kink” — and I don’t know if Jones got it wrong, or the builders of the copy in 1964 got it wrong. But there is a difference.
In today’s ceiling, the line coming off one of the vertices of the eightfold stars is aligned with neither side of the star, but rather with the octagons that appear at the corners of the repeat unit. As a result, the arrowhead shaped piece off the end of one of the rays of the 12-pointed star is symmetrical. In Jones, that line is aligned with one side of the star, and not with the octagon side, so the arrowhead shaped piece is asymmetrical.
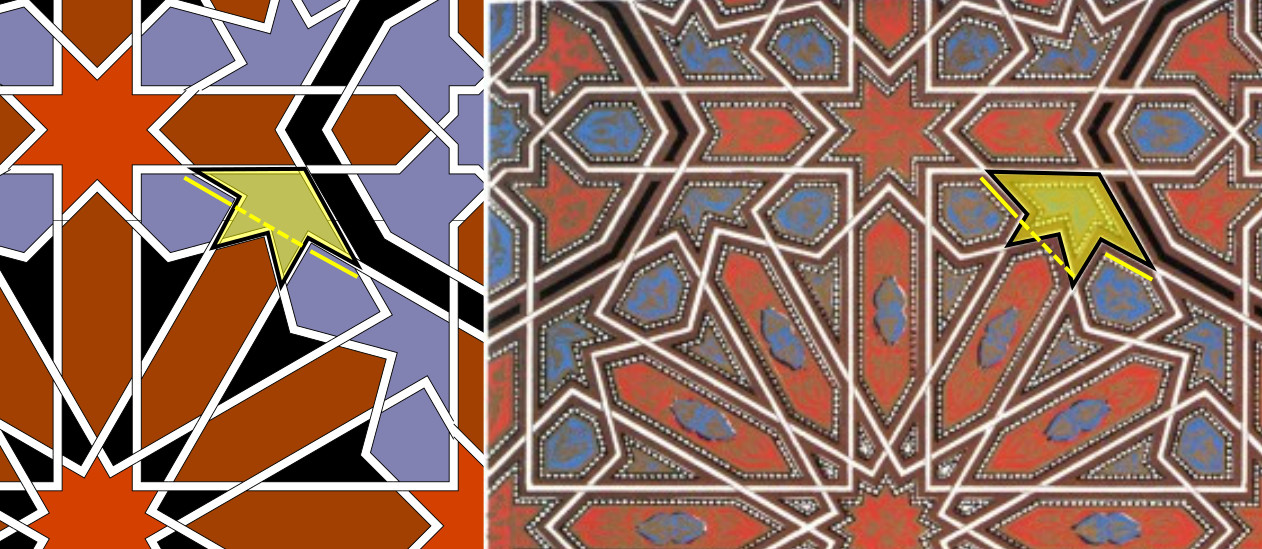
Rendering from tilingsearch.org (left), compared with Jones’s 1856 drawing (right).
My construction method goes with what we see on the ceiling today.
Technically, the repeat unit is just this much:

And there are much smaller repeat units of course: a quarter of the square would suffice. Even half a quarter of the square would suffice. But from the point of view of construction, it’s easier to visualize with the entire outer frame.

So let’s construct that.
Phase 1
Draw an initial circle and establish within it the square which frames the basic repeat unit of the pattern. Then draw the outer edges of the 12-pointed star that dominates the centre of the pattern
- Draw a circle (“Circle A”).

2. Inscribe the master square within it.
2.1. Draw a horizontal line through the circle’s centre
2.2 Bisect it to make a vertical line through the same centre
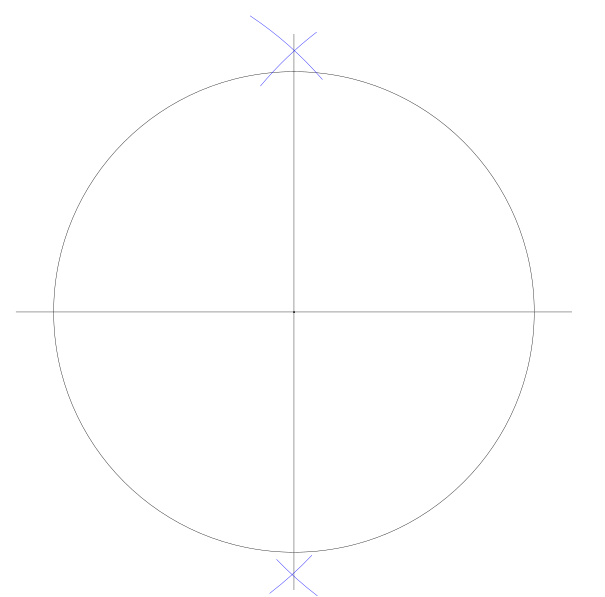
2.3. Draw four arcs (same radius as Circle A) centred on the four points of intersection between Circle A and the two lines just drawn.
2.4. Draw diagonals connecting the points where the arcs intersect outside Circle A.
2.5. Note where the diagonals intersect Circle A, and join those points to form the master square. You should now have this:

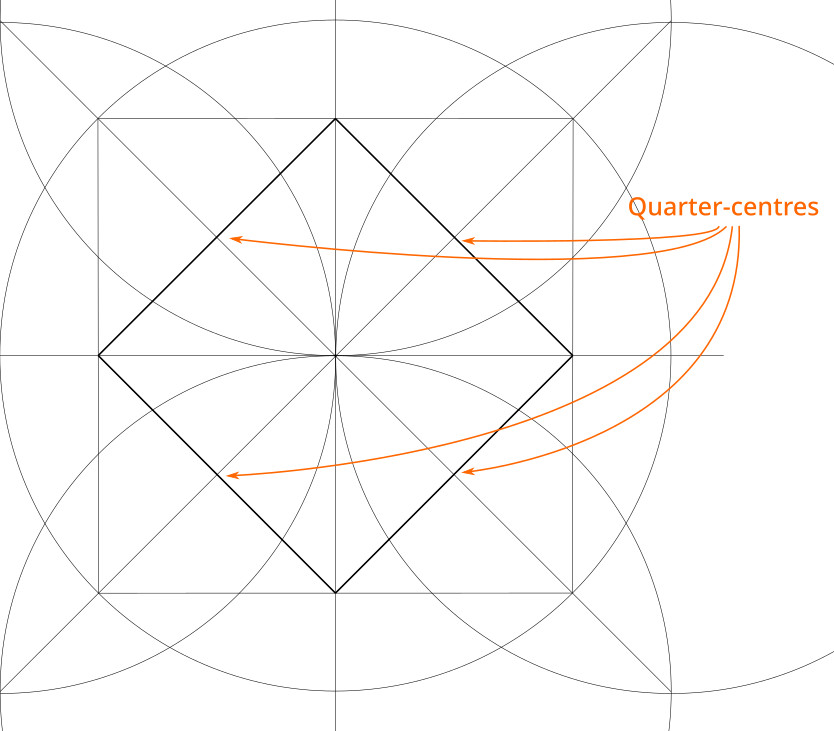
3. Locate the quarter-centres of the square. These are the centroids of each quarter-square.
3.1 Locate the midpoint of each side of the square.
3.2. Connect adjacent midpoints with diagonal lines
3.3. The quarter-centres are where the diagonals from step 2 above intersect the lines connecting the side midpoints. You should have:
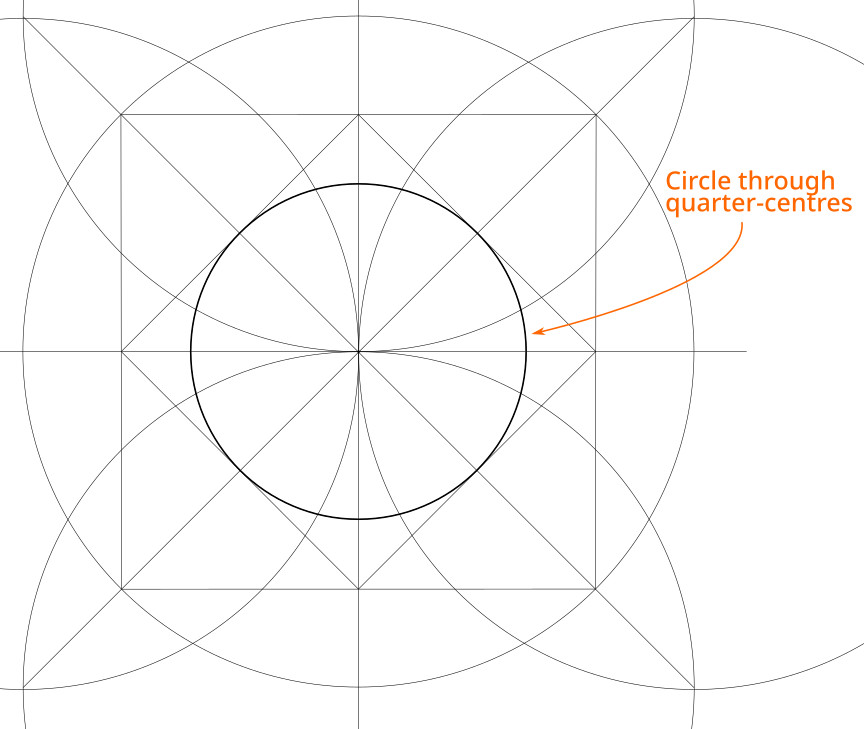
4. Draw a circle centred on the same point as Circle A, but through the square’s quarter centres (Circle B).
5. Draw the additional lines to split these circles into 24 equal segments. Getting these radiating lines evenly spaced will make the final pattern look much better, so it’s worth taking your time with this step.
5.1. So far we have already divided Circle A into 8 equal arcs using the horizontal, vertical and diagonal lines.

5.2. Eight more divisions can be made by connecting four pairs of points. They are the intersections between, on the one hand, the construction arcs we made for the master square, and, on the other, Circle A.
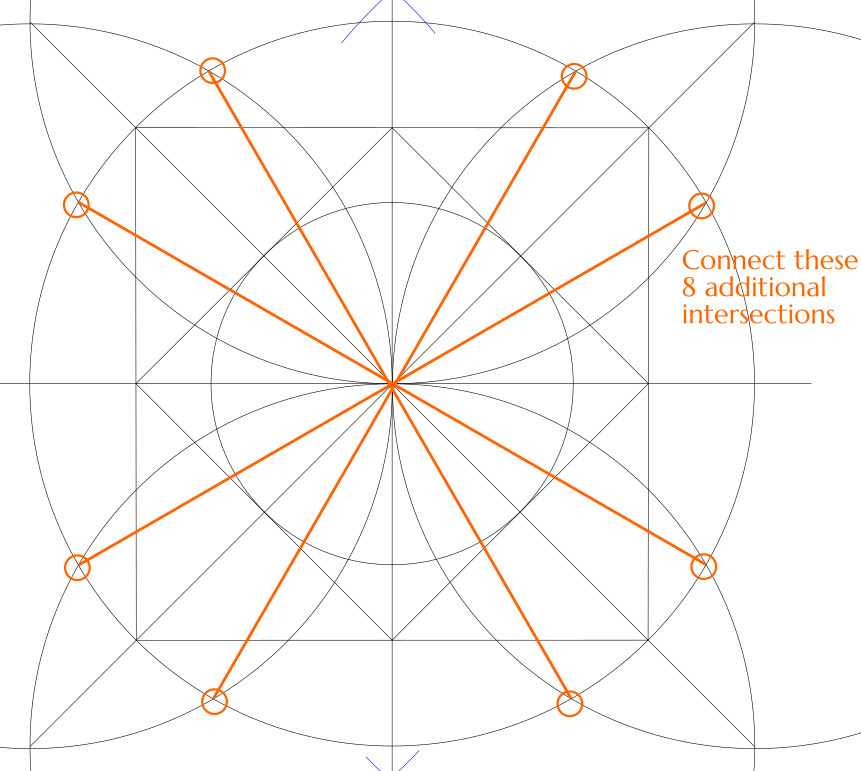
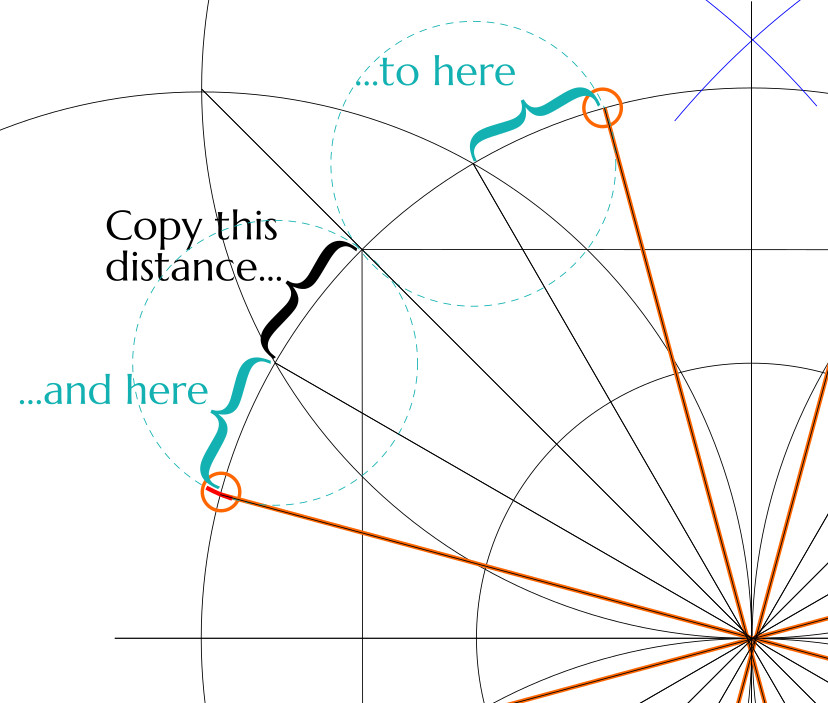
5.3. For the last eight points, there is no easy solution. However, we already have enough of the radial lines that we can just copy the interval between them onto the remaining arcs. You could also do this using the usual angle bisecting technique, but really it’s easier to just use a compass set to the span of one of the existing 1/24th arcs.
You should now have 24 radial lines, with 1/24th of the circle between each pair of them.
6. Observing where the radial lines intersect Circle B, construct a few lines between intersections that are four apart, extending them out to the next 1/24th radial. You really only need a few of these.

7. Now draw a circle (Circle C) going through these outer intersections.

8. Draw line segments alternating between circles B and C, starting at a quarter-centre of the square. You should get a 12-pointed star.
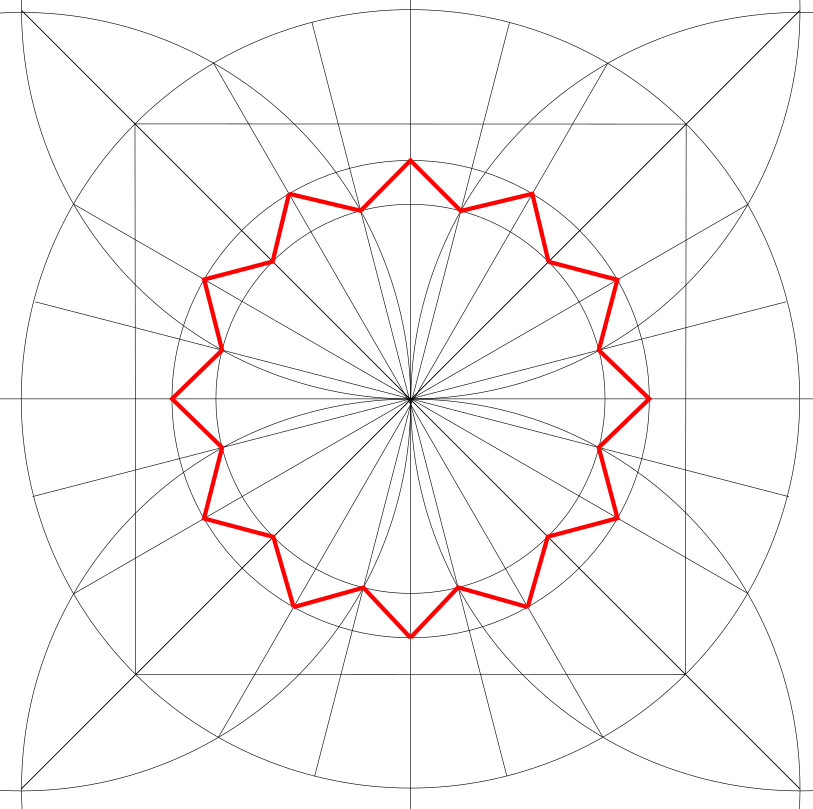
This is the first part of the pattern we will actually ink.
Phase 2
In the second phase, we establish the 8-pointed stars centred on the midpoint of each side of the master square, and then let them dictate the twelve pairs of parallel lines that make the star at the heart of the pattern. Also, we will draw the 8-pointed stars in the corners.
1. At the midpoint of each side of the master square, draw a circle centred on that midpoint whose radius just touches the nearest approach of the 12-pointed star we’ve drawn. We’ll call this Circle D. We’ll be drawing a lot of circles with the same radius as Circle D over the next few steps.
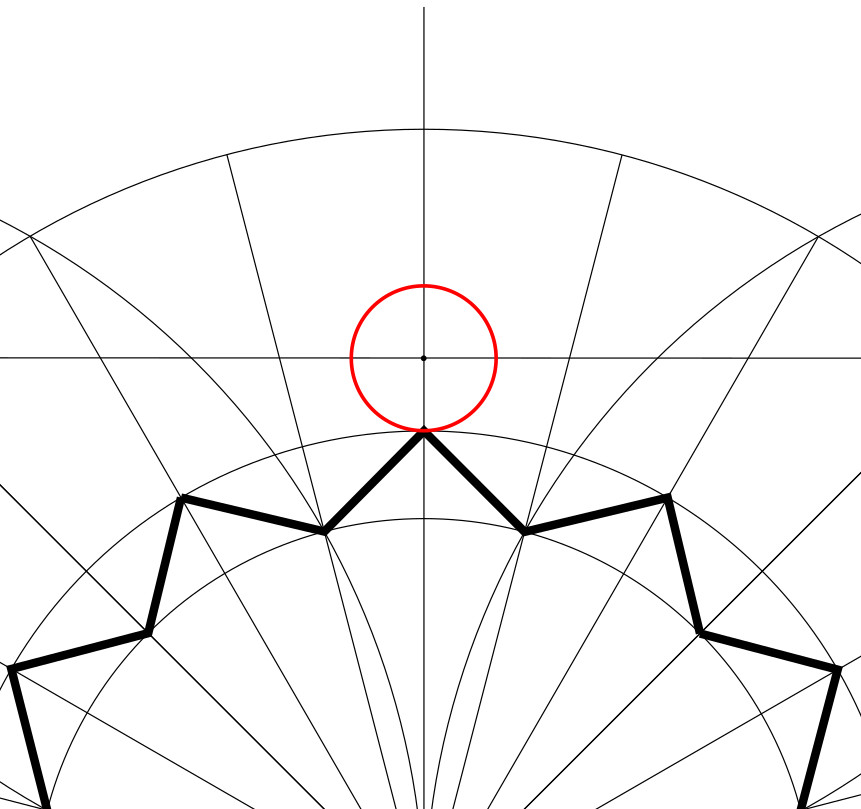
2. For that circle, draw circles of the same size centred on each of the four cardinal points.
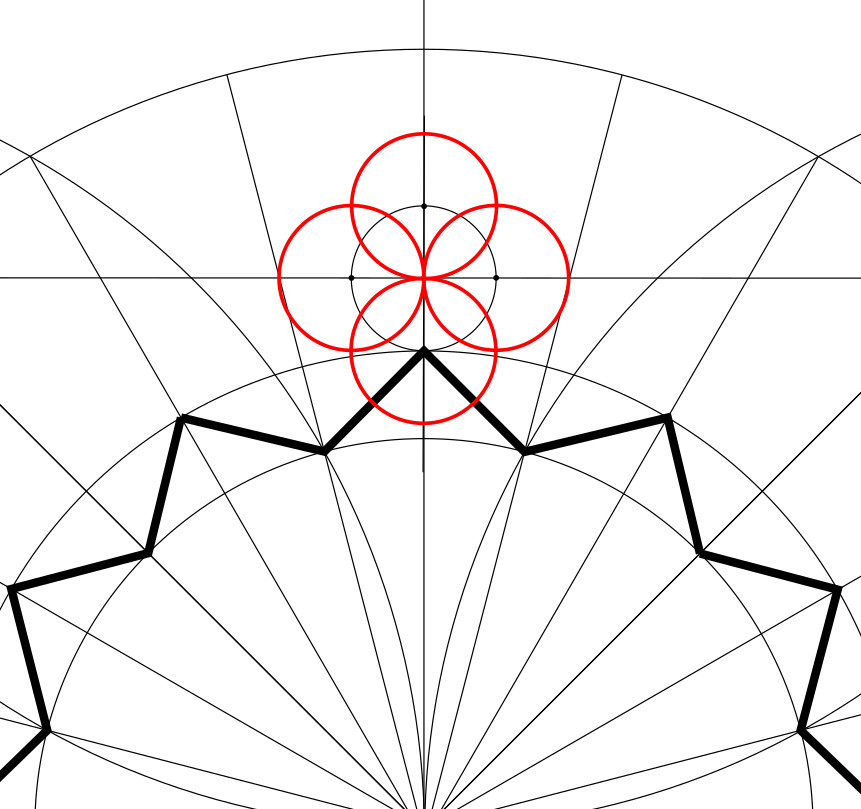
3. Then draw diagonals through adjacent circle centres and intersections. This allows you to identify 8 evenly-spaced points around Circle D.
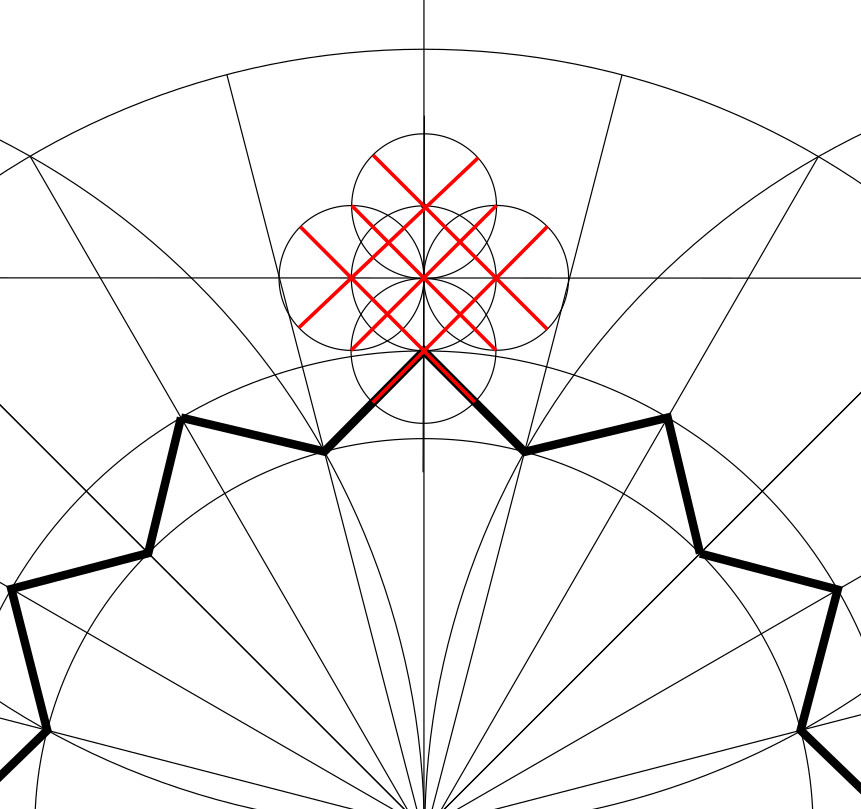
4. Trace the lines of the 8-pointed star. These are inkable.
5. Repeat to create 8-pointed stars on the other 3 sides of the master square.
6. Extend the 8-pointed star sides in parallel pairs, to create channels that run across the master square and along its sides.

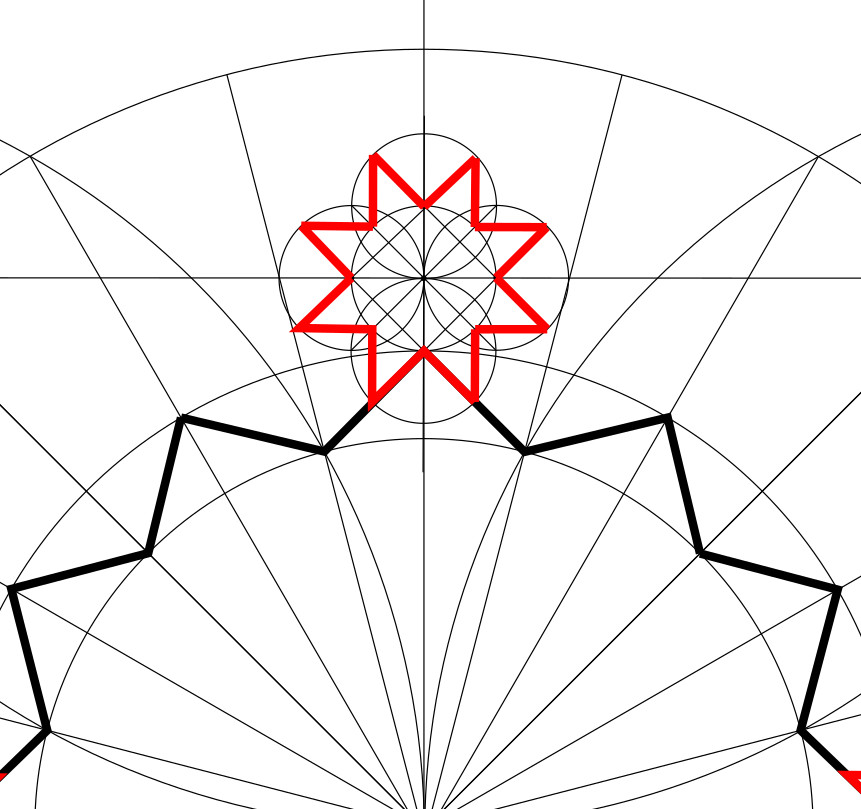
7. Now we need to draw four more pairs of parallel lines crossing the 12-pointed star. Using the same radius as Circle D, mark out two points on either side of each vertex of the 12-pointed star. (No need to do the vertices that already have an eight-pointed star adjacent to them.)
8. Connect corresponding pairs of these marks to make four more pairs of parallel lines. Extend these lines until they hit the master square.

9. Ink these lines inward from the 12-pointed star, stopping where they meet partners that are perpendicular to them. You should have twelve channels within the central star, emanating from another 12-pointed star at their centre. Each channel has the same width, and this width is shared with the channels framing the master square.

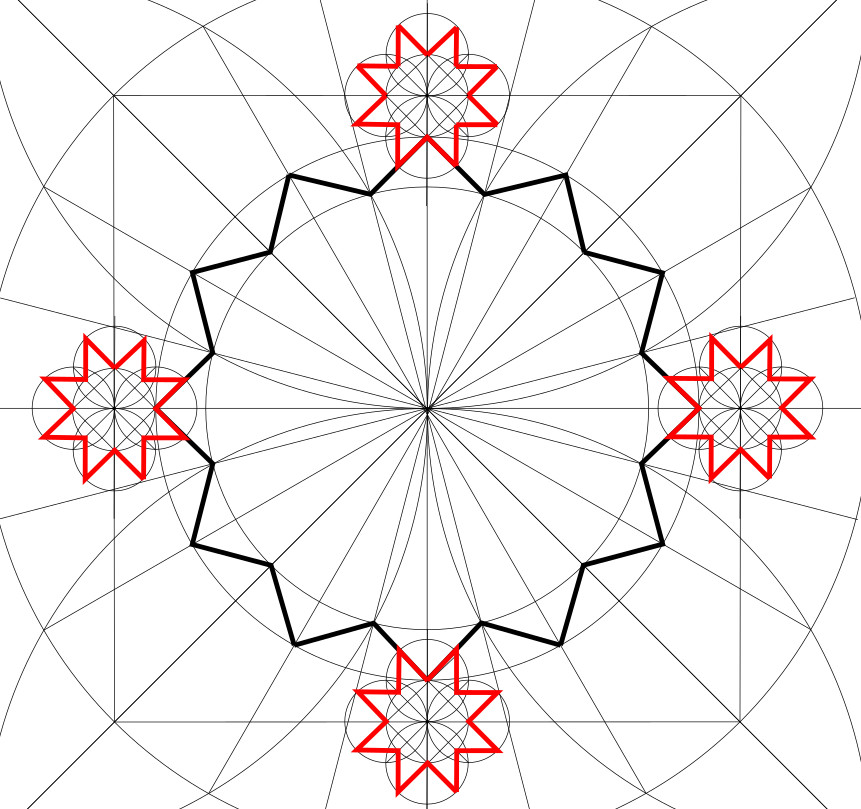
10. At each of the small corner squares formed by outer frame channels (drawn in step 6, above), draw a circumscribed circle. (It’s the same radius as Circle D.) Extend the sides of the master square to intersect the far sides of this circle. Noting the cardinal points of the circle, connect adjacent ones as shown, so diagonal lines extend into the framing channel.
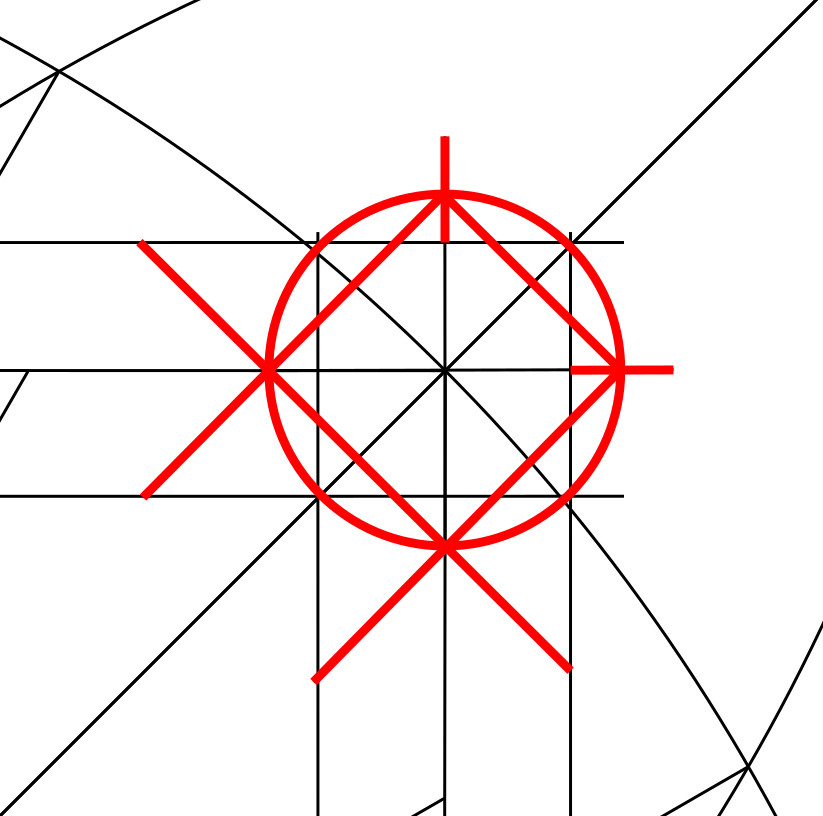
11. Ink in an 8-pointed star inside each circle.

12. And ink in the parallel lines extending from the stars in the middle of each side of the square, as shown.

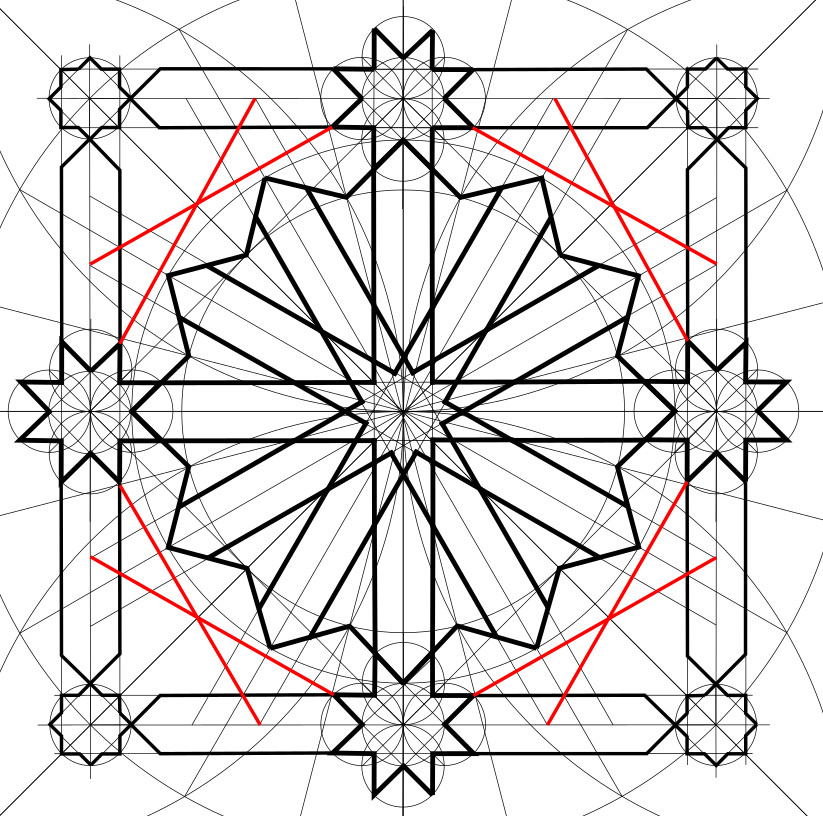
Phase 3
In the final phase, we will fill in the corners.
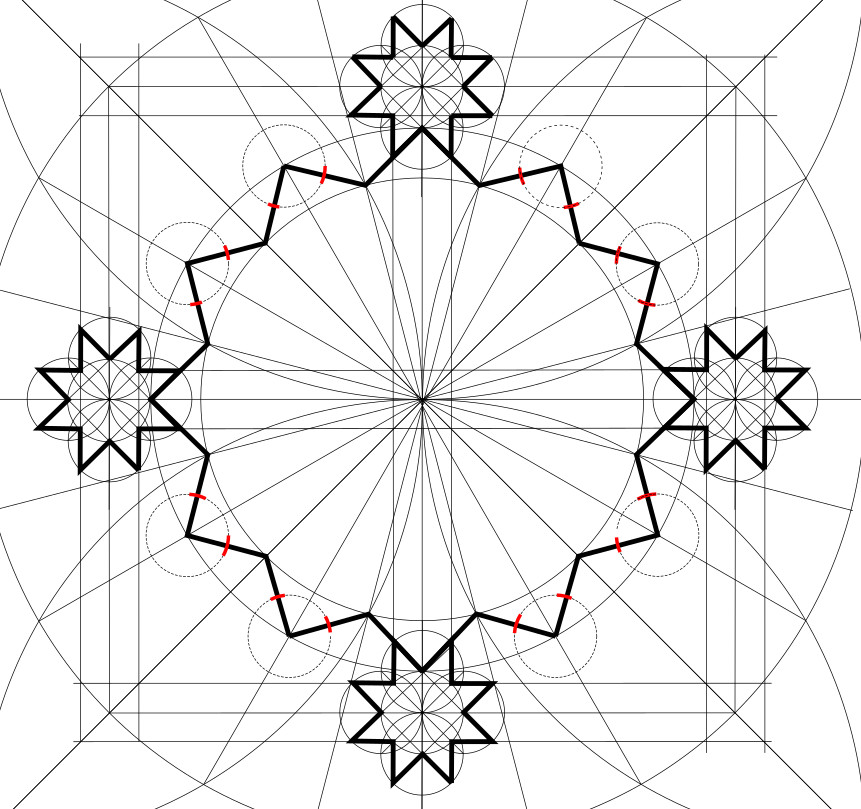
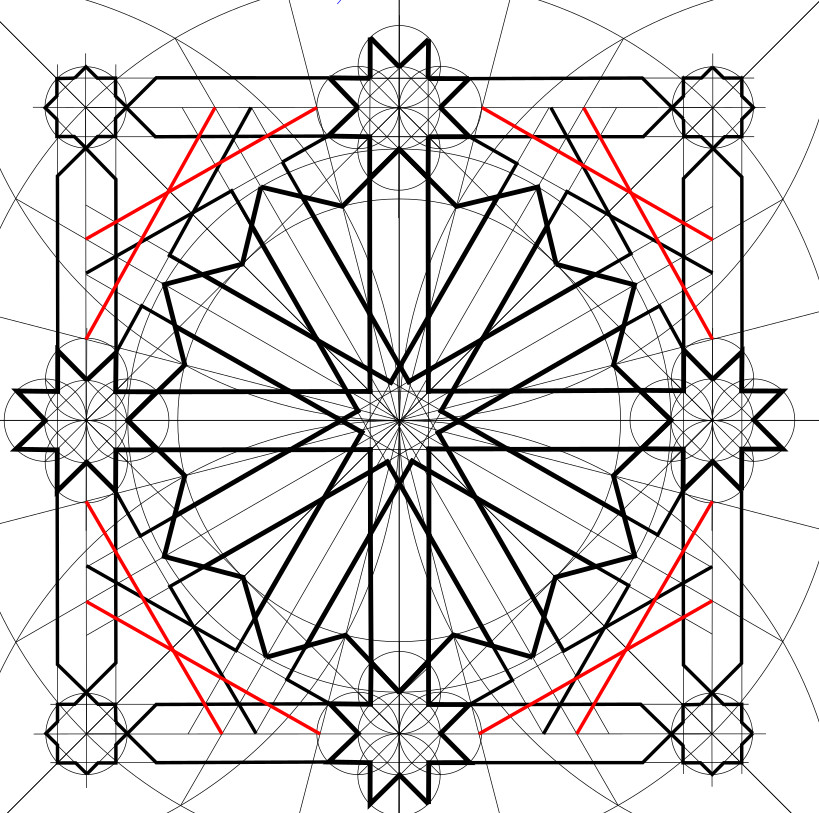
1. Draw construction lines for the corners. As shown below, there are two lines in each corner. They both go from the tip of one of the mid-side-8-pointed stars to a specific intersection where the master square meets one side of a channel. (This is actually slightly wrong, but the error should be imperceptible. See Part 2 for a discussion of what’s going on here.)

2. Ink extensions of the channel lines out of the 12-pointed star and turning through a right angle onto one of these construction lines just drawn, as shown below.

3. Draw similar construction lines for the octagons. This is the only part of the pattern for which you need to draw a line without having two specific points to connect. You have one point, which is where a 1/24th radial, at either 30° or 60°, hits the master square. Through that point you need to draw a line parallel to one of the construction lines drawn in step 1.
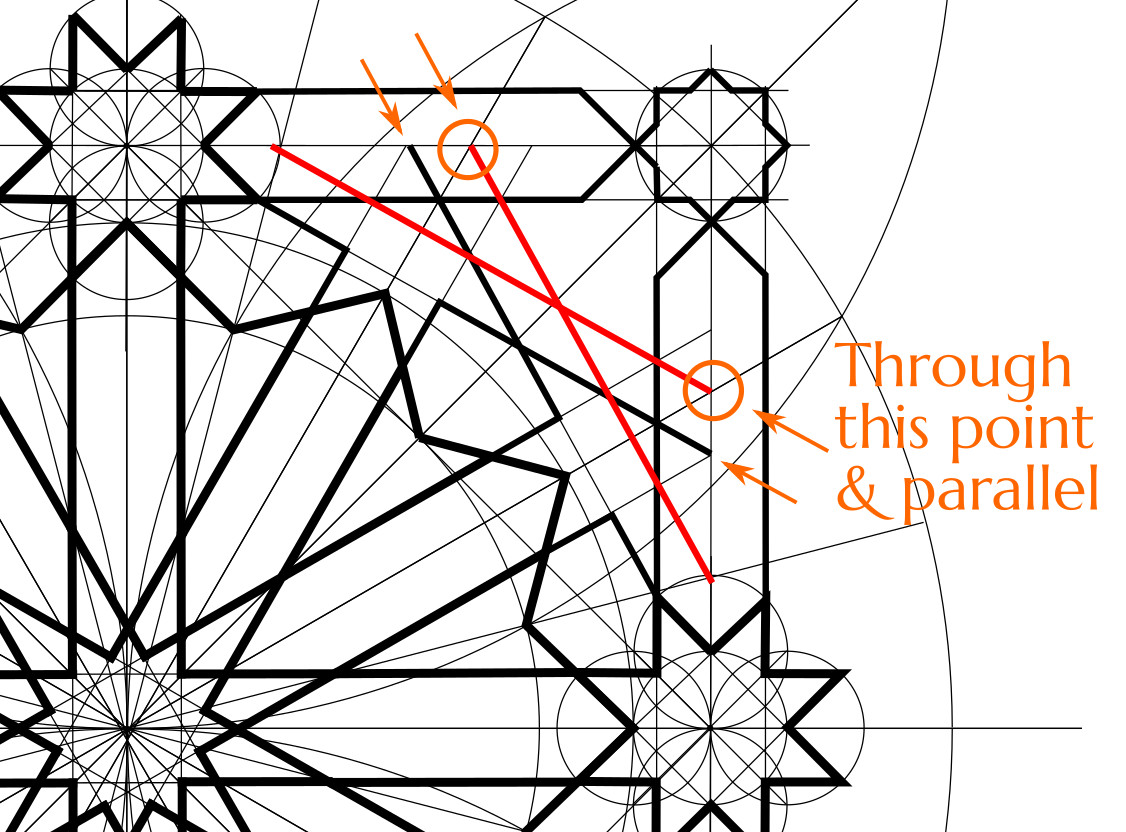
4. Ink these in as shown.
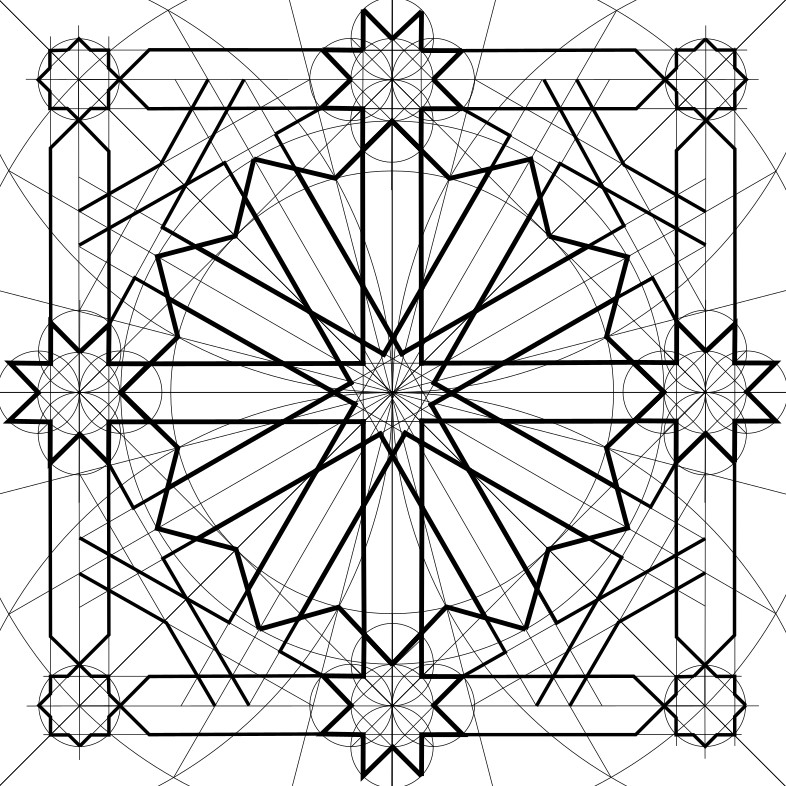
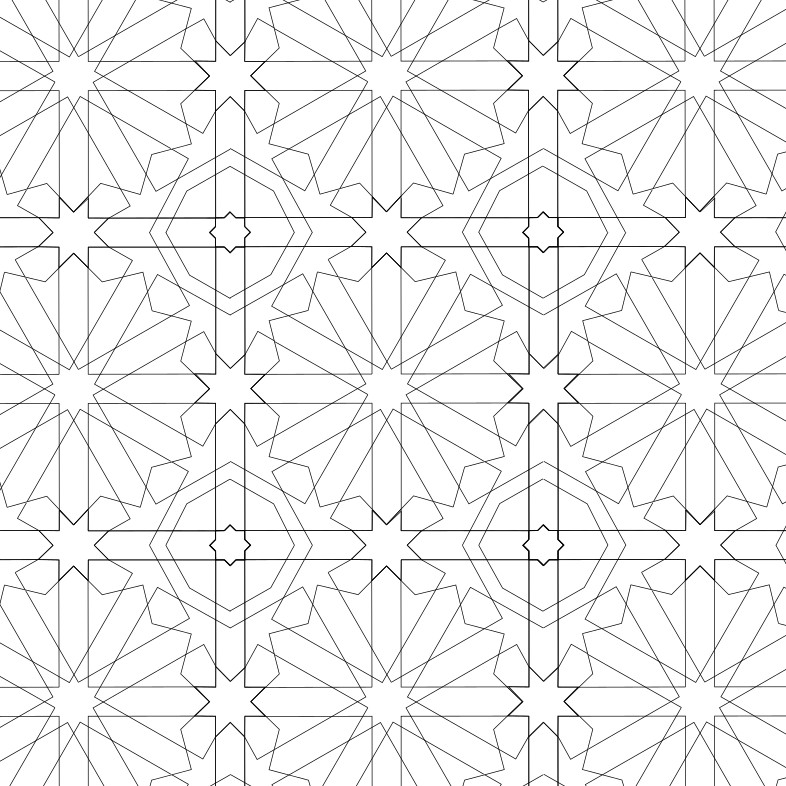
And you’re done!

You now have a completed pattern which you can repeat above and below, as far as the space you need to fill. The frame provides an overlap for aligning adjacent tiles.
Now, having done all of that, you probably would like to know why we did some of the things we did. Why did they work?
If so, read on to Part 2.

One thought on “Constructing the Pattern on the Sala de la Barca Ceiling”