(This is the math geek part about the Sala de la Barca ceiling. For instructions on constructing the pattern with compass and straightedge, go over to Part 1.)
In the process of figuring out how to draw this pattern, I ran into a lot of questions, and had to do more than a little math to answer them.
Two families of symmetry
One of the most interesting things to notice about this pattern is that it includes two distinctly different types of symmetry. There’s twelvefold symmetry inside the frame, but there’s eightfold symmetry on the frame.
They’re not incompatible, but eightfold and twelvefold patterns do things a bit differently. The eightfold stars have lines at 0° (horizontal), 45° and 90° (vertical), but the twelvefold stars send out lines at 0°, 30°, 60° and 90°. So we shouldn’t be surprised if there will be some weird little shapes in the corners where the 30° and 60° lines coming out of the twelve-fold stars meet and blend into the 0°, 45° and 90° lines coming out of the frame. Maybe a little hanky-panky to make it all work. More on that later.
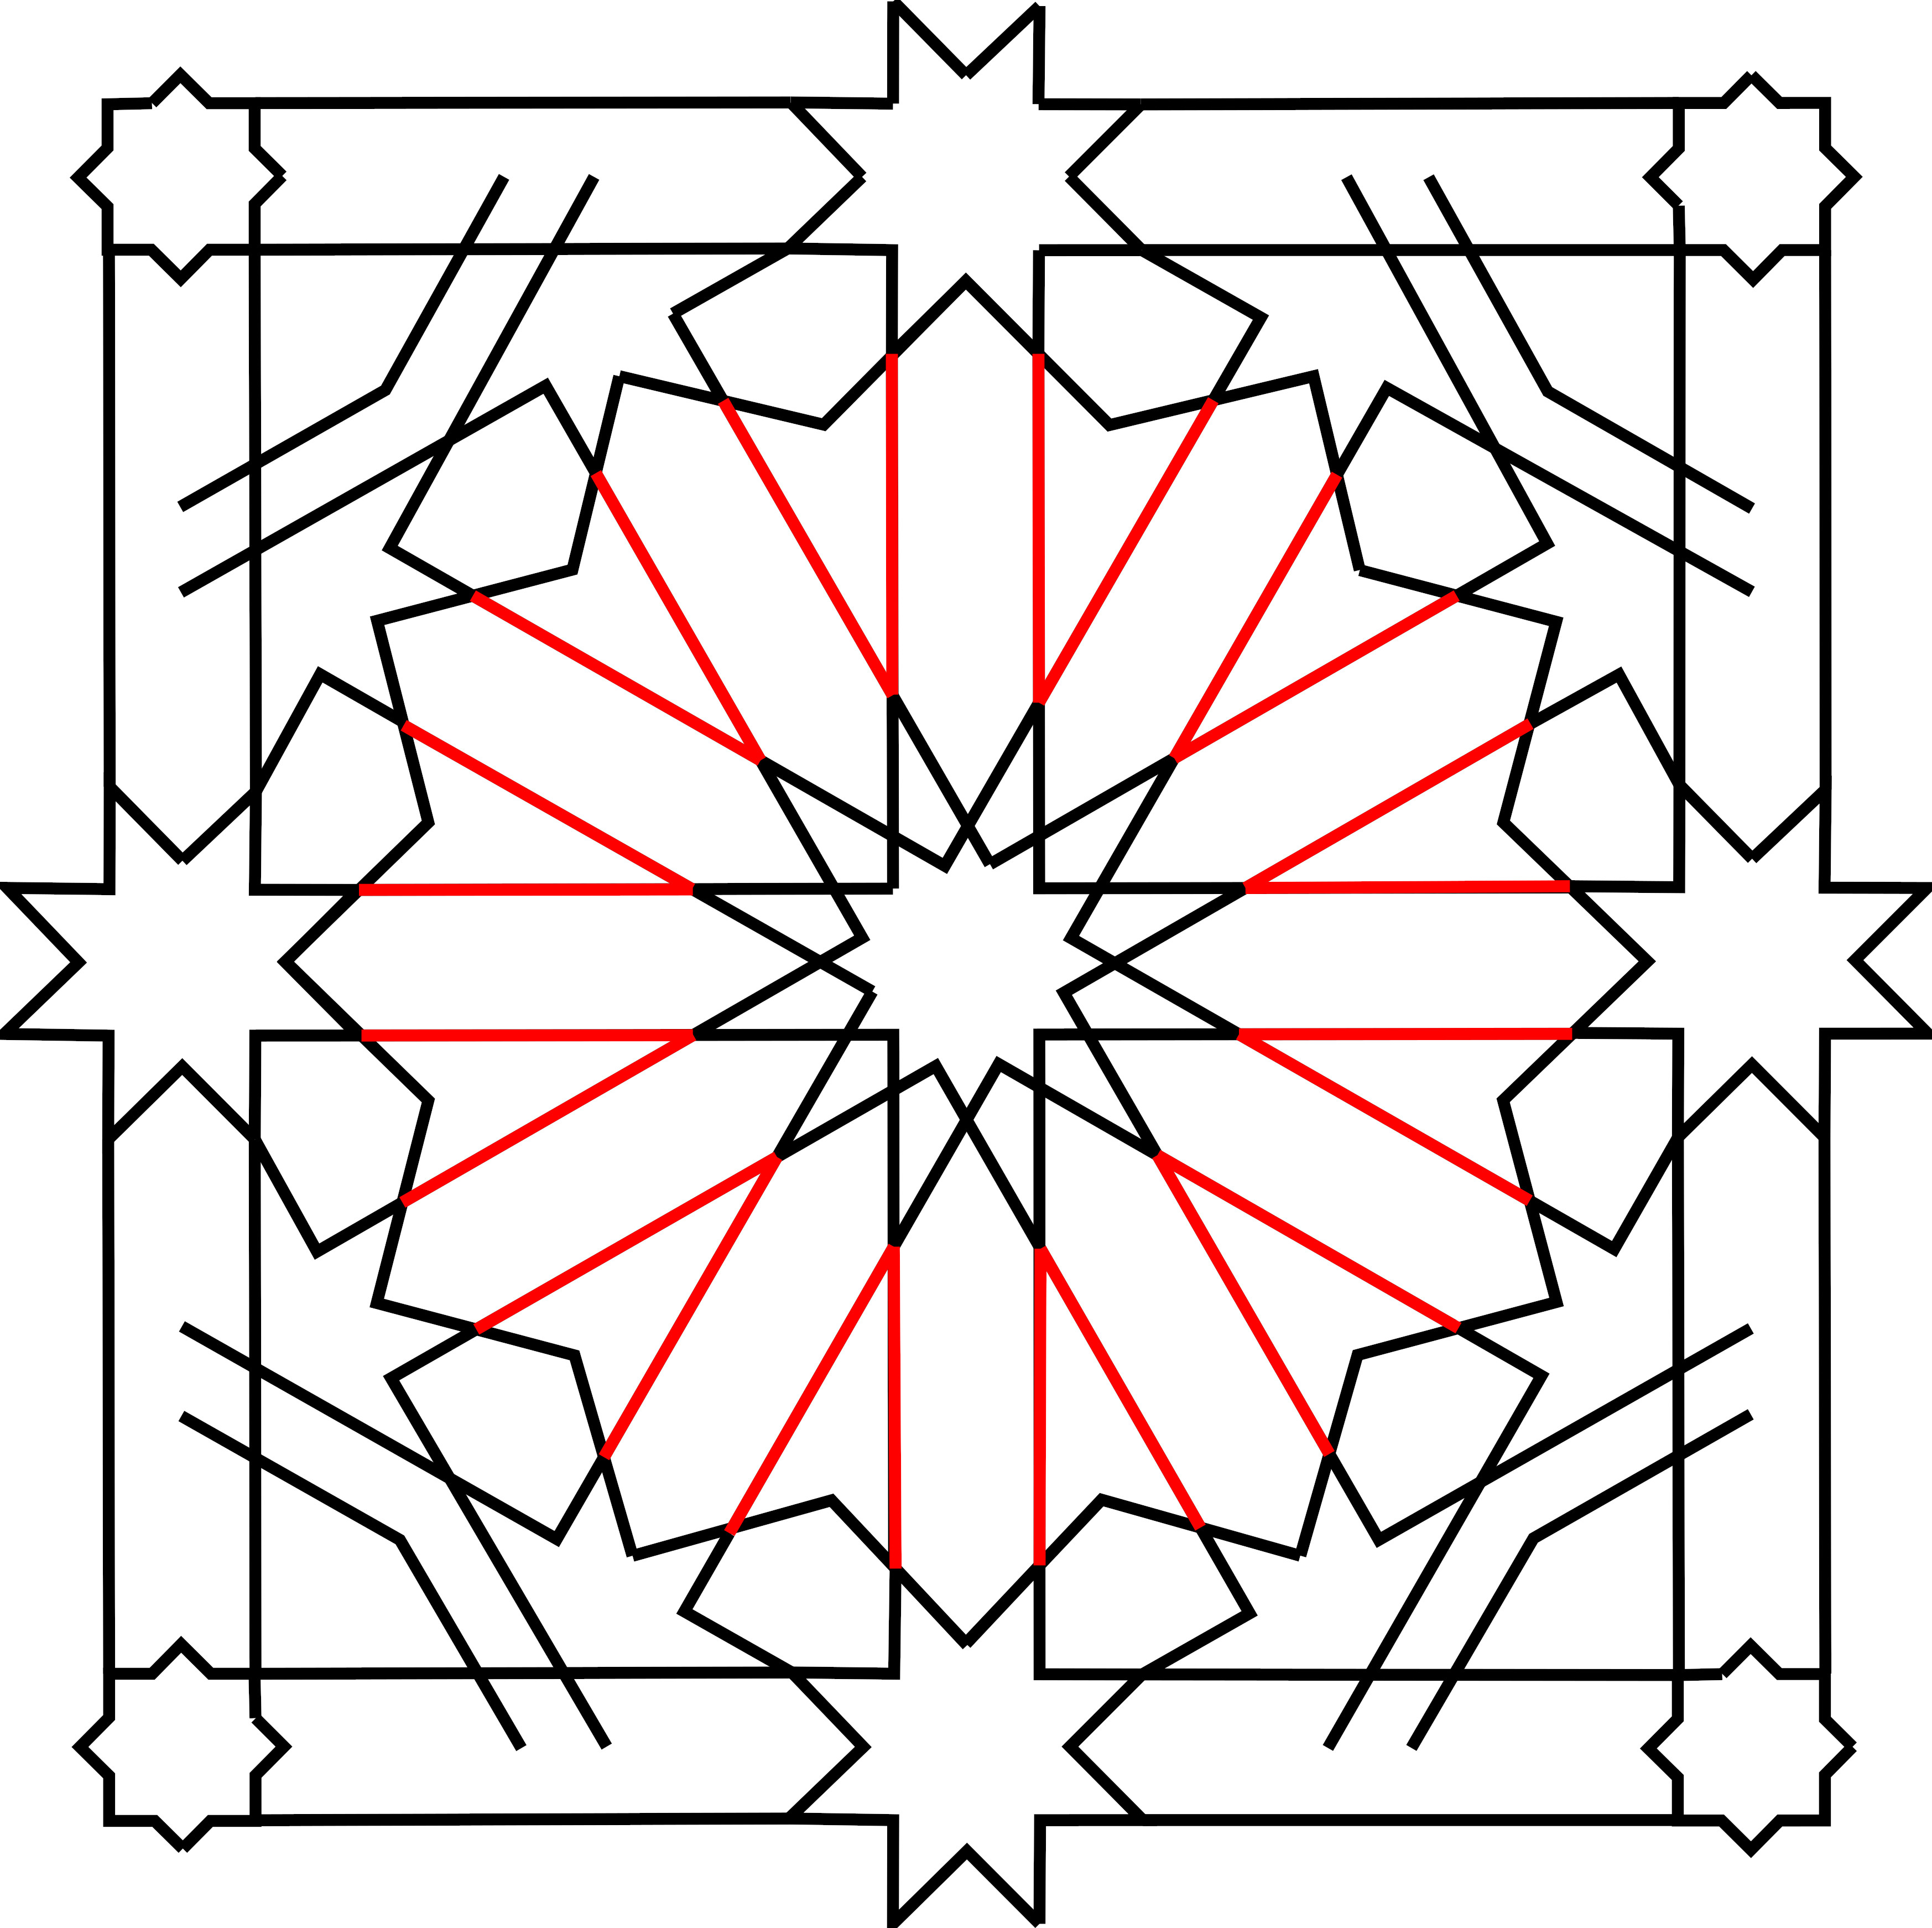
Let’s look at the twelvefold part first. The major feature inside the frame is the 12-fold star. But this star is actually composed of two stars.
One is the {12/3} star that forms the outside of what we initially see as the star.

The notation “{12/3}” (a Schläfli symbol) tells us that there are 12 vertices equally spaced around a circle, and the star is generated by stepping around these vertices hitting every third one.

If you’re familiar with the stellations of a dodecagon (there’s a nice chart on the Wikipedia page), this one is recognizable as the {12/3} star because the internal angles of its vertices are 90°.
The other component is the {12/5} star that sits in the centre. It’s recognizable as a {12/5} star by its vertex internal angles of 30°.

The sides of the {12/5} star have been extended outwards in parallel pairs to the {12/3} star, forming 12 channels.
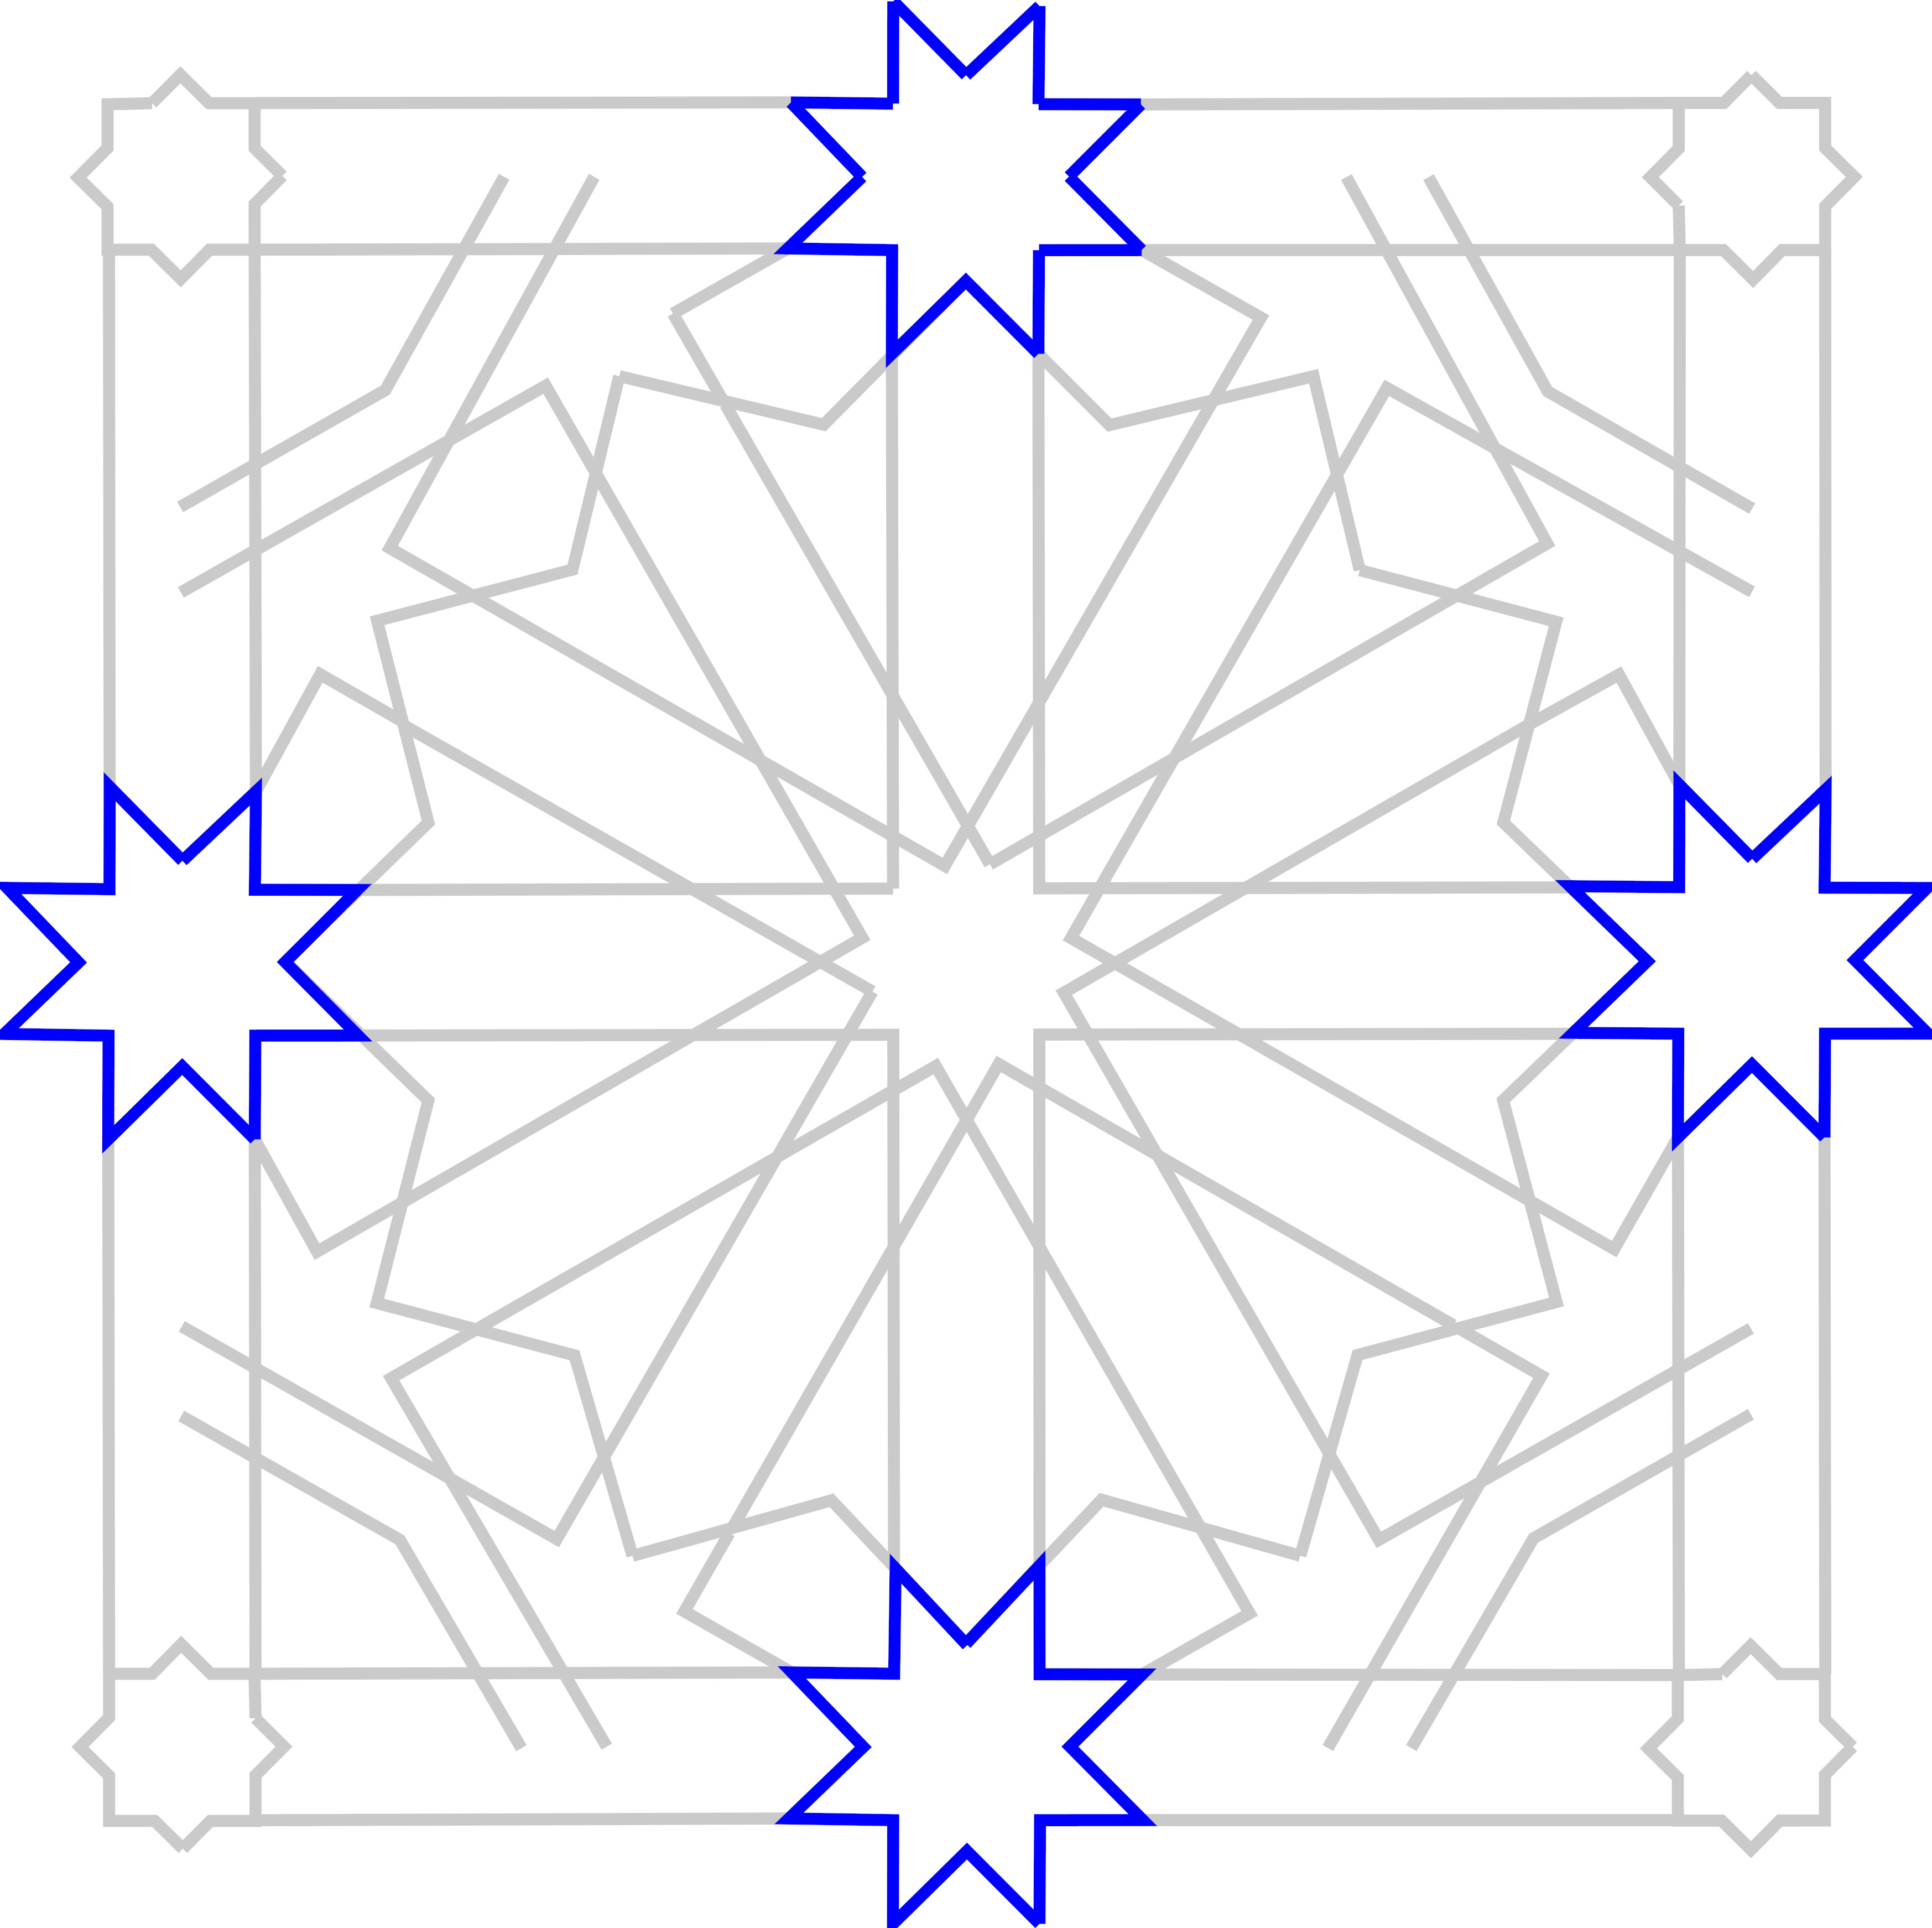
All of this twelvefold symmetry is set in a square frame based on eightfold symmetry. The frame is made from channels of parallel lines. The width of these channels is the same as that of the channels extending from the {12/5} star.

The frame has {8/3} stars at the midpoints of each side. The {8/3} stars are sized so the channels are extensions of their sides, as are the cardinal (North, East, South, West) channels coming out of the {12/5} star.
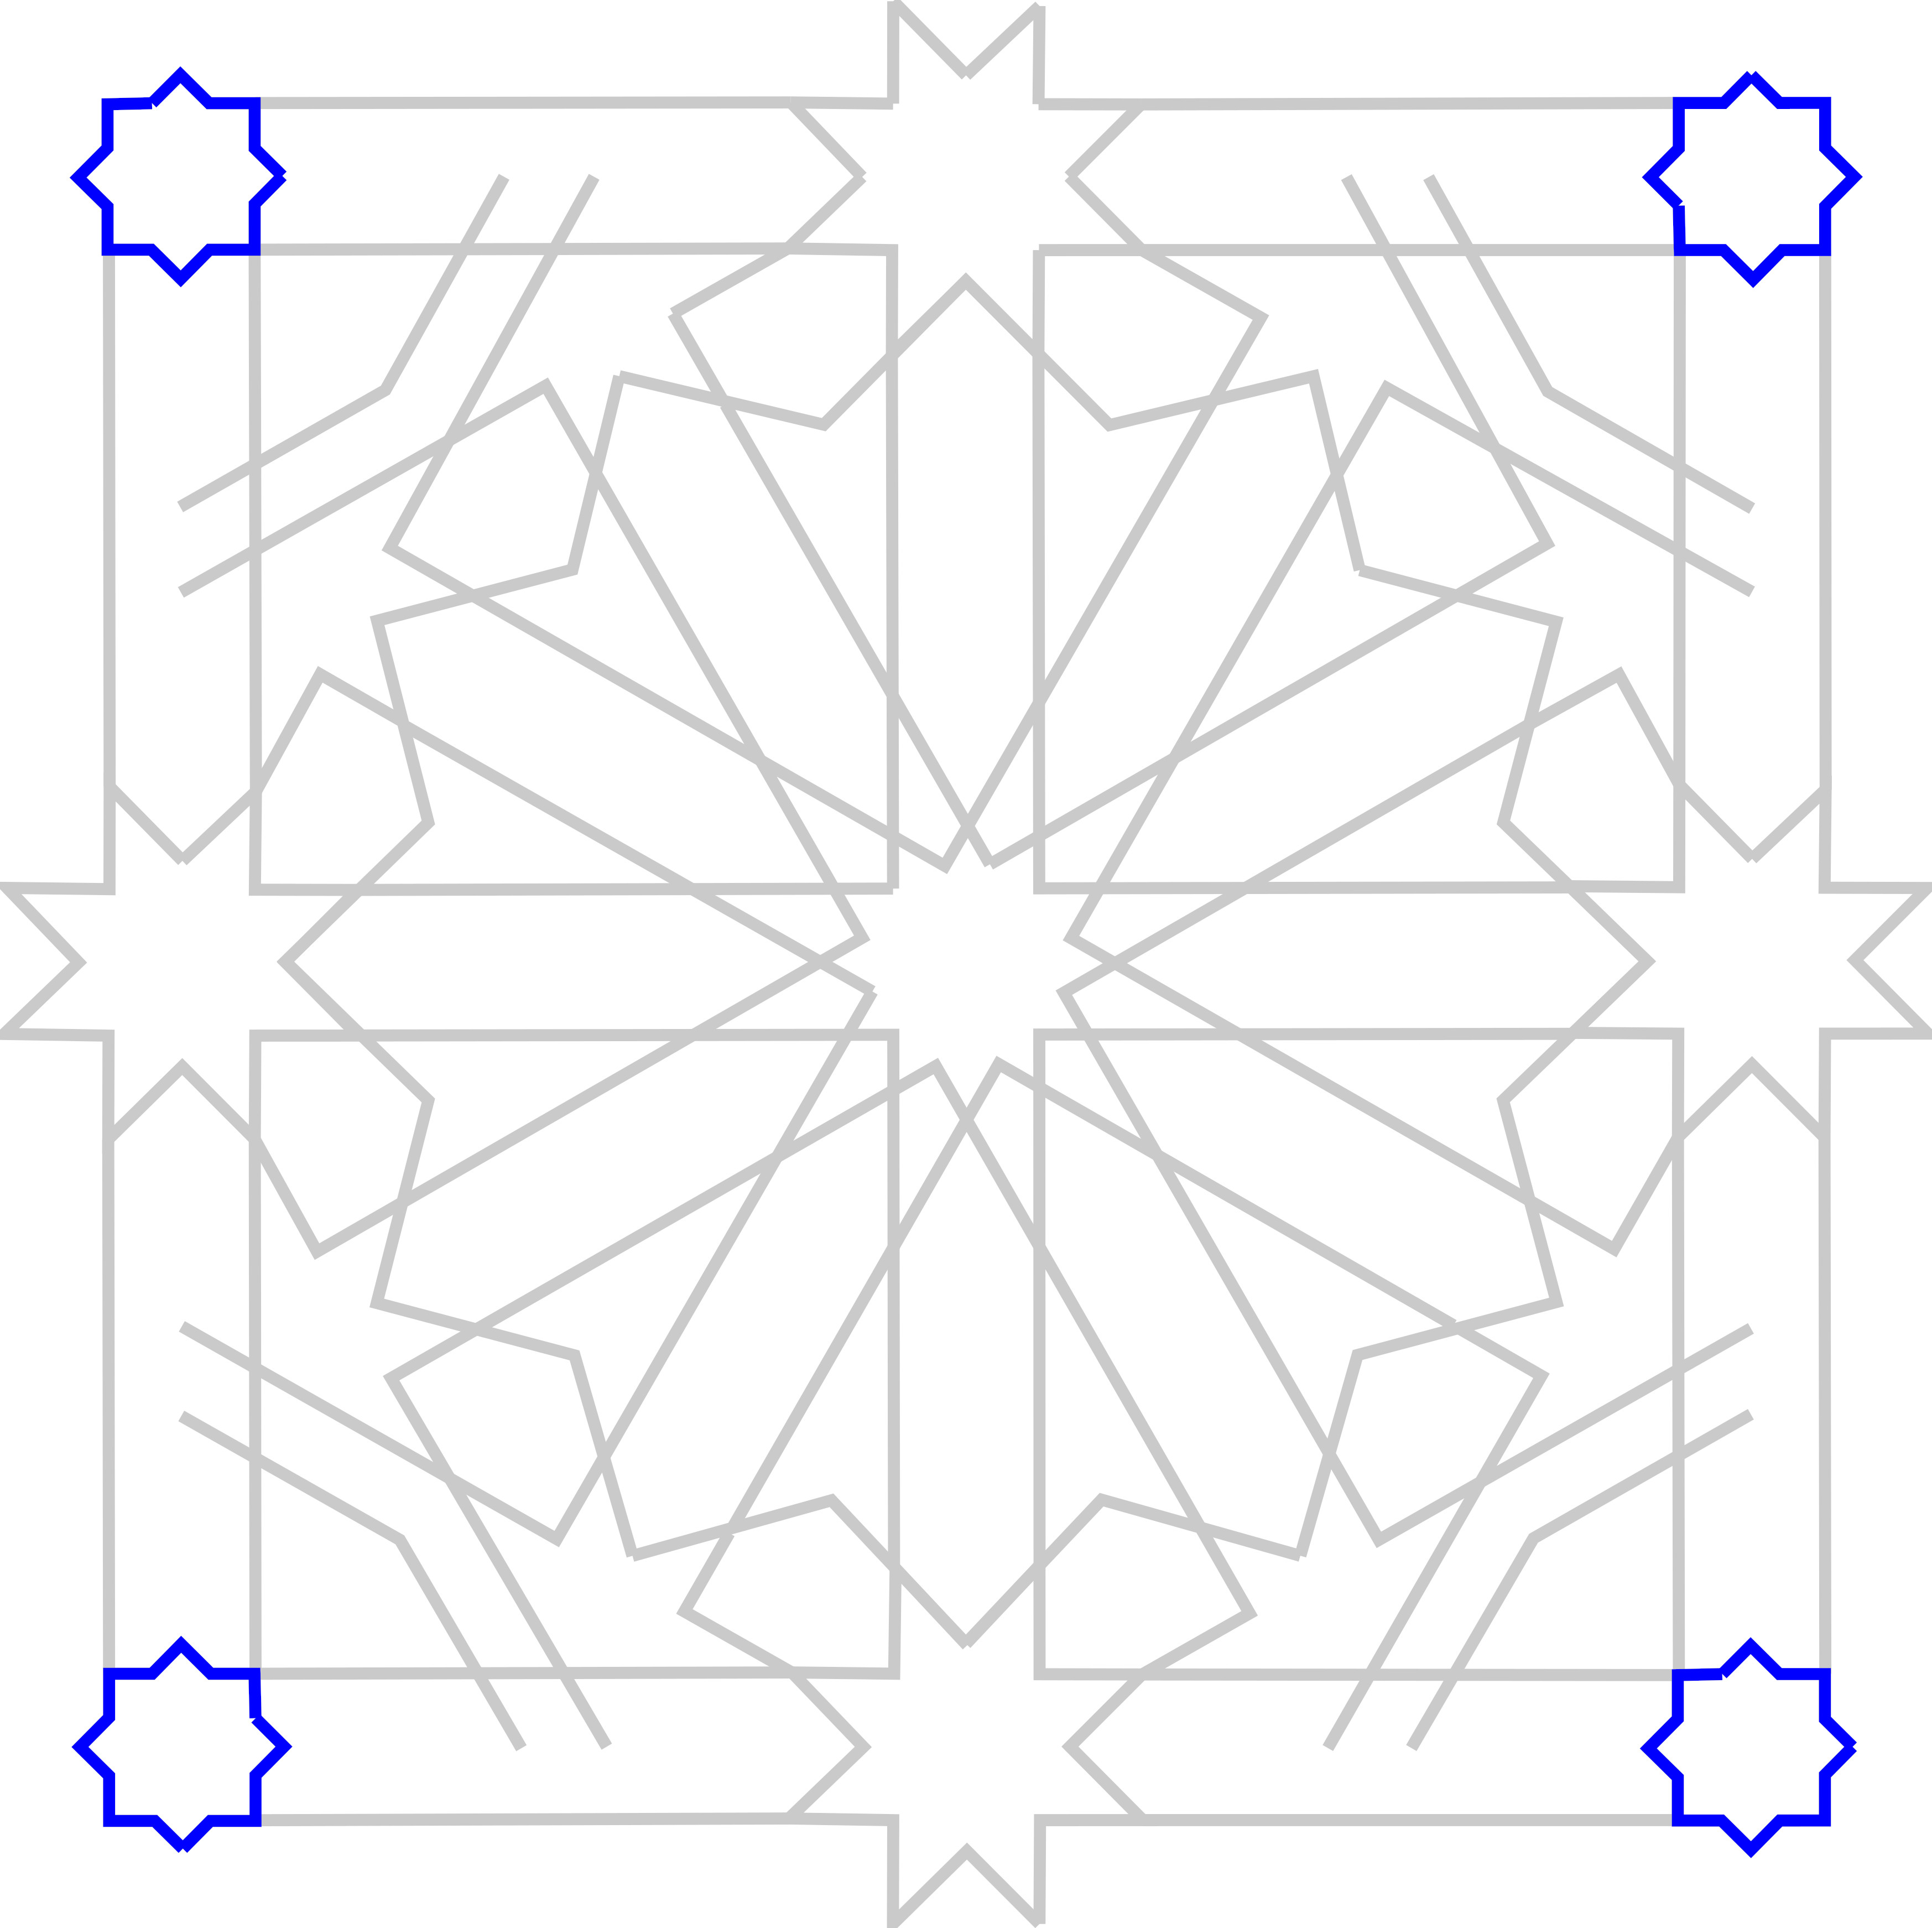
At the corners of the square are {8/2} stars, also sized to match the channels.
Dividing the circle in 24
The first challenge of drawing this pattern was divide a circle into 24 equal parts. (Twelve for the twelvefold symmetry, but then 24 because the halfway divisions are very useful too.)
By the time we got to phase 1, step 5.2, we already had the circle divided into eight parts (i.e., at 0°, 45° and 90° in each quadrant) simply by virtue of having drawn a square in it.

But how then to get the important lines at 30° and 60°? One can’t trisect an angle, so we can’t generate them by trisecting the right angle in each quadrant of the square. Instead, we got them by drawing through points A & B, as shown below.

But why does this work?
It works because A & B are intersections between circles that share the same radius and have their centres on each other’s edges.
Just as in the classic construction of a hexagon, equilateral triangles are made and it’s easy to show that the two angles have to be 30° and 60°.

Then, to finish up getting the full 24 divisions of the circle, we also needed lines at 15° and 75°. I have seen people suggest that in this case you can draw through the intersections of those same arcs with Circle B (points C & D, below).

But this doesn’t really work. The result is not 15° and 75°. This becomes apparent when we construct a triangle like this…

We’d be hoping that the two angles at the base of this isosceles triangle would be 75°, leaving a perfect 15° between point C and the x-axis.
But in fact for such an isosceles triangle, where the two equal legs are twice the length of the base, the peak angle is…

…leaving 75.5225° for the two base angles. The complementary angle is 14.4775°. It’s close to 15°, but not quite right. And visibly so: if you draw the actual 15° line next to it you can see the difference.

So we resorted to copying the arc length for 15° from other parts of the circle.
How many independent variables are there?
It does initially look like the width of the channels is more or less independent of the length of the side of the square. It appears one could, for example, narrow the channels and make a variant pattern where the {12/5}, {8/3} and {8/2} stars shrink, and the {12/3} star grows larger. Something like this…

However, in the Sala de la Barca ceiling there’s no such latitude. The proportions of the twelvefold pattern inside the square, and the eightfold pattern of the square frame itself, are locked together by the fact that the dimples of the {12/3} star at the semi-cardinal points (NE, SE, SW and NW), fall exactly on the quarter-centres of the square.
This is why we drew Circle B through the quarter-centre of the square, and then built the {12/3} star outside it.
This requirement fixes the size of the {12/3} star relative to the square. The size of the {8/3} stars then depends on the space between the {12/3} star and the square. And the size of the {8/2} stars, the width of the channels that frame the pattern, and the width of the channels that emanate from the {12/5} star all depend on the size of the {8/3} stars. The whole thing is connected. Once you draw one part, you’ve determined the size of all parts.
Building a {12/3} star on its inscribed circle
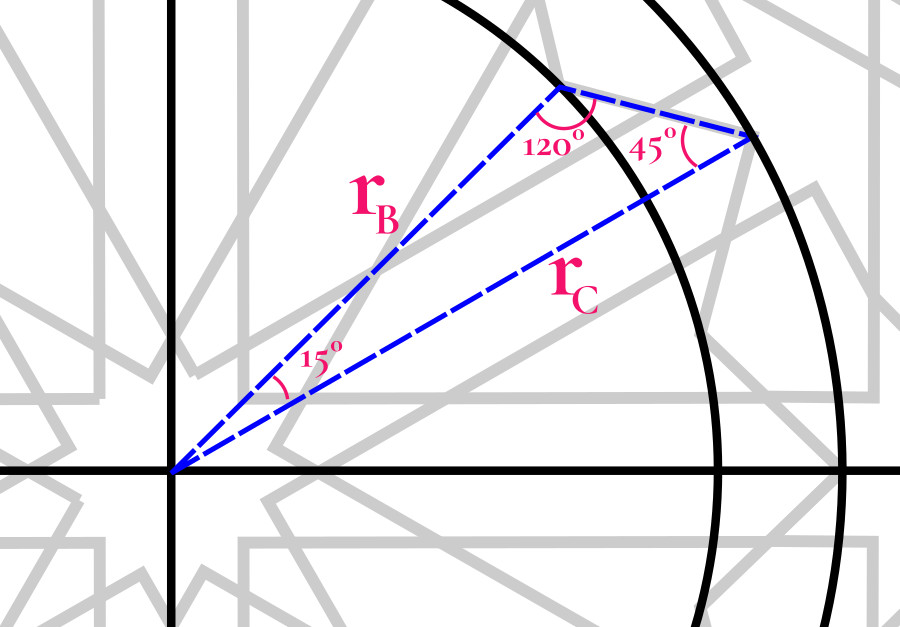
In Phase 1, step 6, we determined the radius of Circle C (which is the circle circumscribed around the {12/3} star) by drawing line segments between points on Circle B, and extending them out until they met. Circle B was divided into 24 equal arcs, and we joined points in a skip-4 pattern. The intersections of the extended lines told us where Circle C was. Why did this work?

As noted above, we knew that Circle B was the inscribed circle for a {12/3} star. Our problem was how to generate a {12/3} star on it. It’s a problem in what I would call outward step stellation (as opposed to either inward stellation or outward jump stellation).
Outward step stellation takes us from one stellated figure to the next by extending sides. For example, you can stellate a {12/1} star (aka a dodecagon) outward into a {12/2} star. You do it by extending sides until they meet.
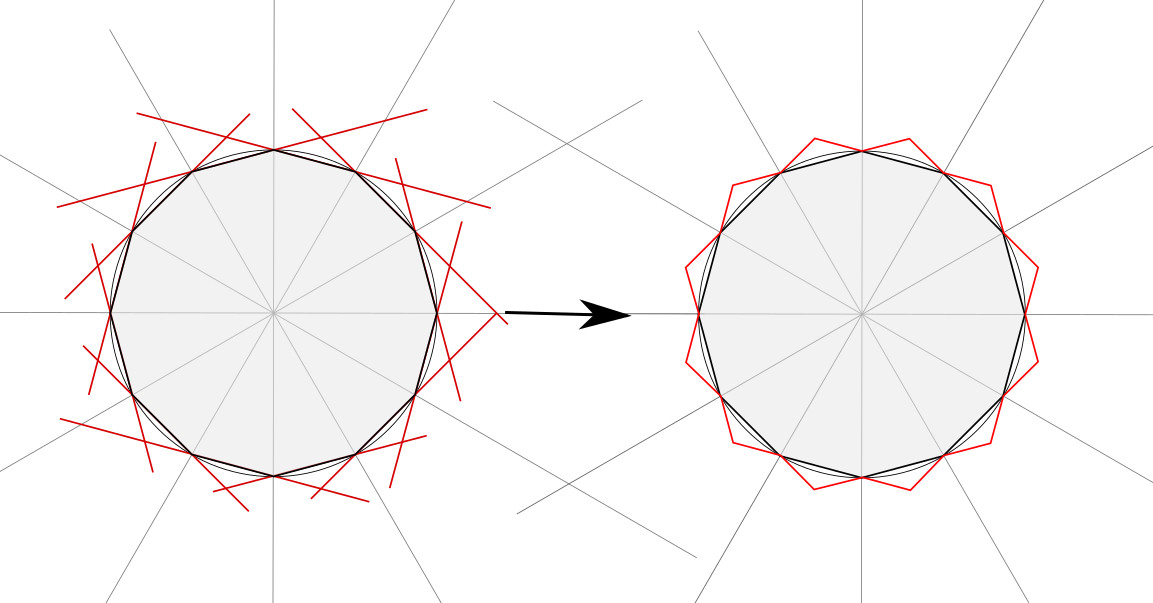
Dodecagon sides in black (left), extended (in red) to their first meeting. They form a {12/2} star (right). Note that, in the process, the first figure’s circumscribed circle became the second figure’s inscribed circle.
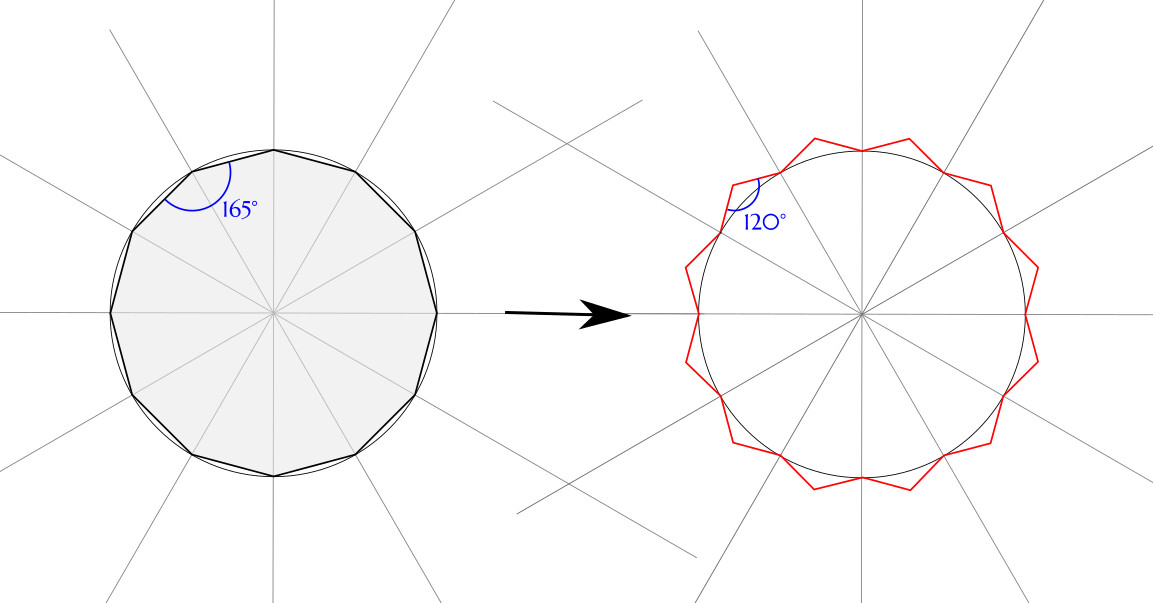
With the new {12/2} star, there’s still a vertex every 30° as you go around, but the vertices have been offset by 15°, or 1/24th of a circle.
The dodecagon had interior angles of 165°; the vertices of the new {12/2} star have interior angles of 120°.
Now, we draw a new circumscribed circle around the {12/2} star, and then we are ready to stellate outward one more step. We get a {12/3} star by extending the sides to their next meeting.
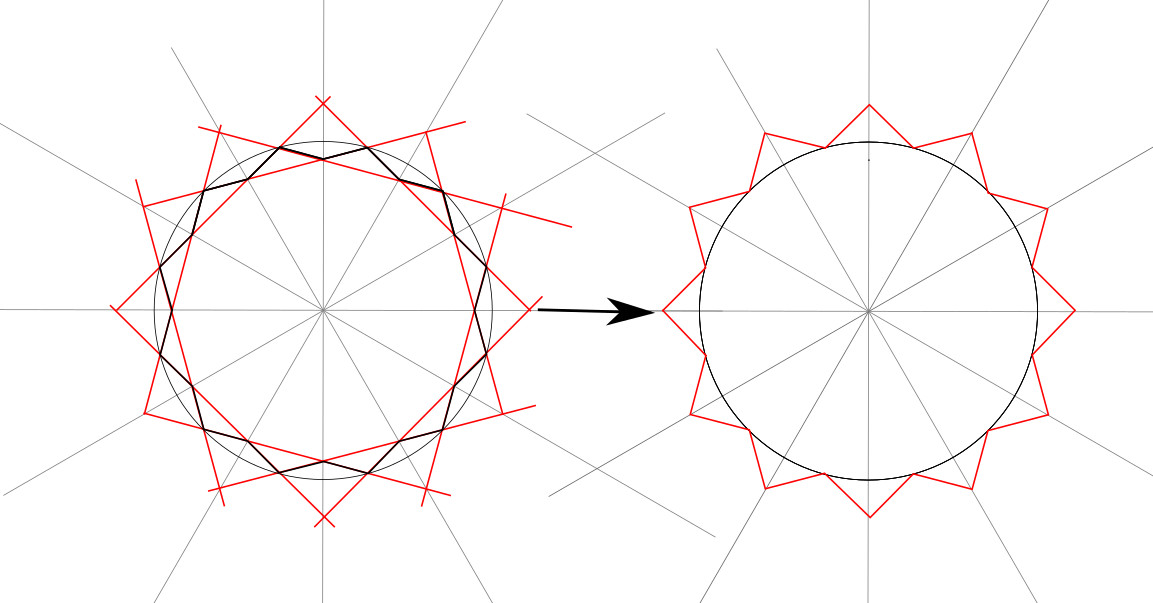
The {12/2} star’s sides extended to make the {12/3} star. The {12/2} star’s circumscribed circle becomes the {12/3} star’s inscribed circle.
The {12/2} star had interior angles of 120°; the new {12/3} star has interior angles of 90°. The vertices are back on the original 1/12th divisions.

It was this, the second outward step of stellation, that we called into play to get from Circle B to Circle C.
Circle B was the inscribed circle of a {12/3} star. Therefore it was the circumscribed circle of a {12/2} star. If we could draw just a few sides of that {12/2} star, and extend them to where they met, we would see where the {12/3} star’s vertices were going to be.
With a {12/2} star, sides join points on the circle that are 2/12ths apart.

That’s also 4/24ths apart.
Since we had our circle divided into 24, we could locate suitable pairs of points for a {12/2} star by skipping ahead four, and then extending them out.
This turned out to be a straightforward way to generate a {12/3} on Circle B.
The ratios
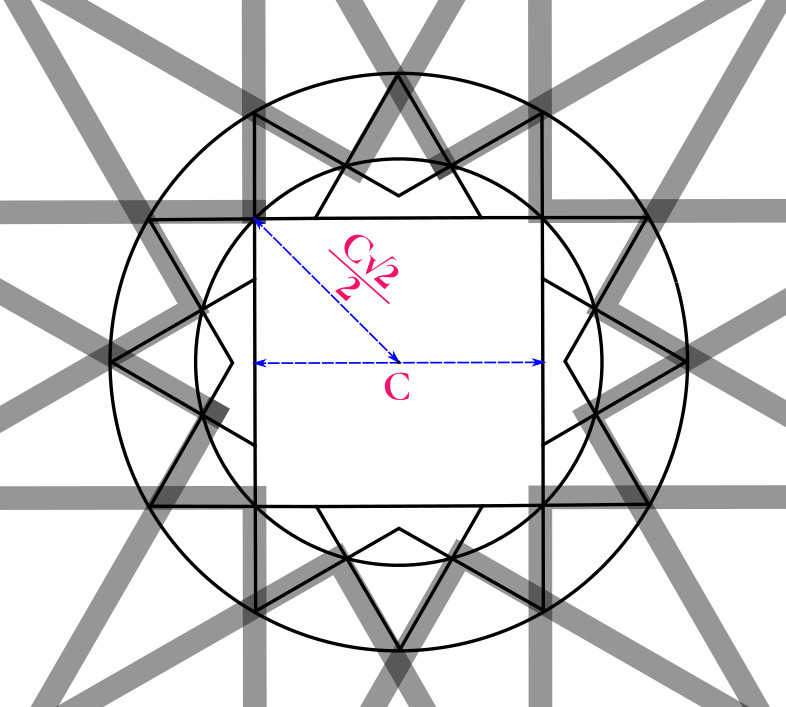
The math to calculate their relative sizes of the elements is not terrible. From a mathematical point of view, we should probably take the radius of Circle D as 1, and express the sizes of the other elements in terms of that. But from a design point of view, we are likely to need to base everything on the size of the square, so we’ll start with that.
If the side of the square is s units, then we know the radius of Circle A.
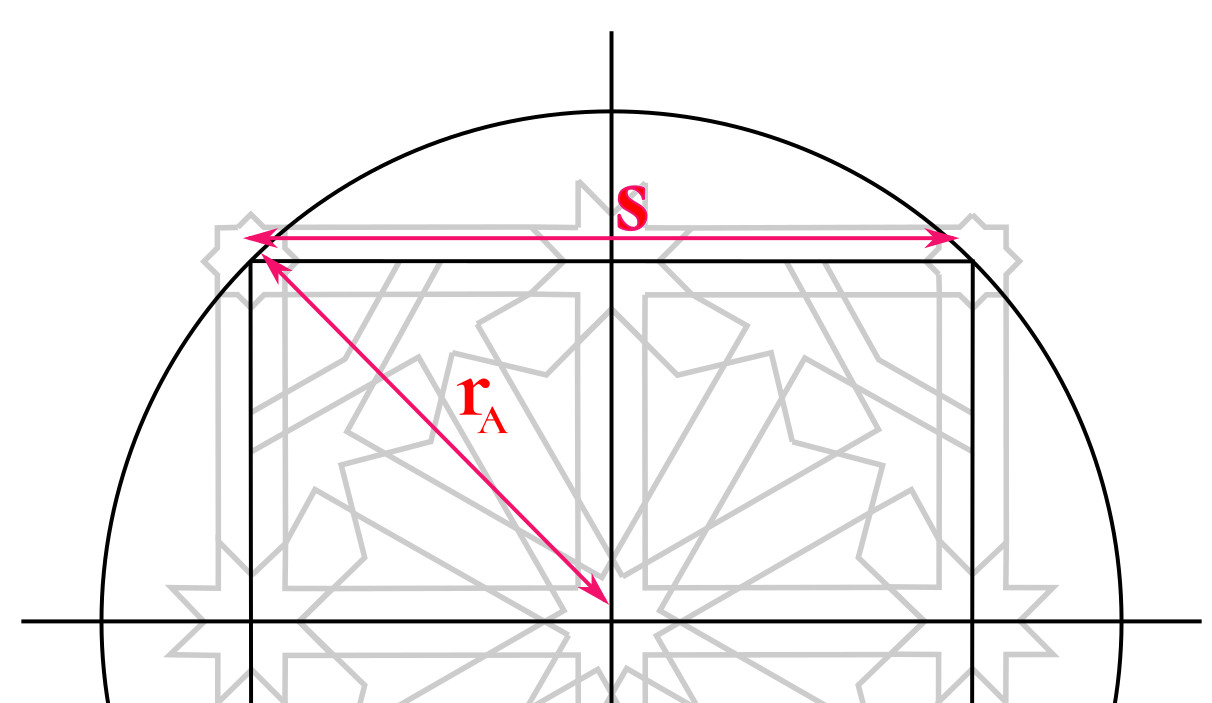

The radius of Circle B is then half of that.


As we go from the circle circumscribed around a {12/2} star (Circle B) to the circle circumscribed around a {12/3} star (Circle C), we can calculate the proportional amount by which the radius increases.


Hence…

And we can calculate the radius of Circle D because it is the space left between Circle C and the master square.


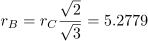
So rD is about 0.066987 times s.
The width of the channels will be √2 times that:

…or about 0.094734 times s. So if your square is 100 cm on a side, your channels should be about 9.5 cm wide.
Now we can go backwards and express everything in terms of rD. If rD is 1, we get…


Drawing the channel lines
Drawing the channel lines that run North–South and East–West was easy because we were simply extending the sides of the {8/3} stars. But to generate channel lines at 30° and 60° we employed the technique of copying Circle D onto each vertex of the {12/3} star.

But those places where the channel lines will hit the {12/3} star: aren’t they just the midpoints of the sides of the {12/3} star?
They are very close. But not exactly. We can prove that.
Just as when they are coming into an {8/3} star, the channel lines hit the sides of the {12/3} star a distance of rD down from the vertex point.
For this to be the midpoint, then each side of the {12/3} star would have to be twice rD. We can figure out the side of the {12/3} star from the triangle we drew above.


Whereas…

So the length of a side of the {12/3} star is almost twice rD, but not quite.
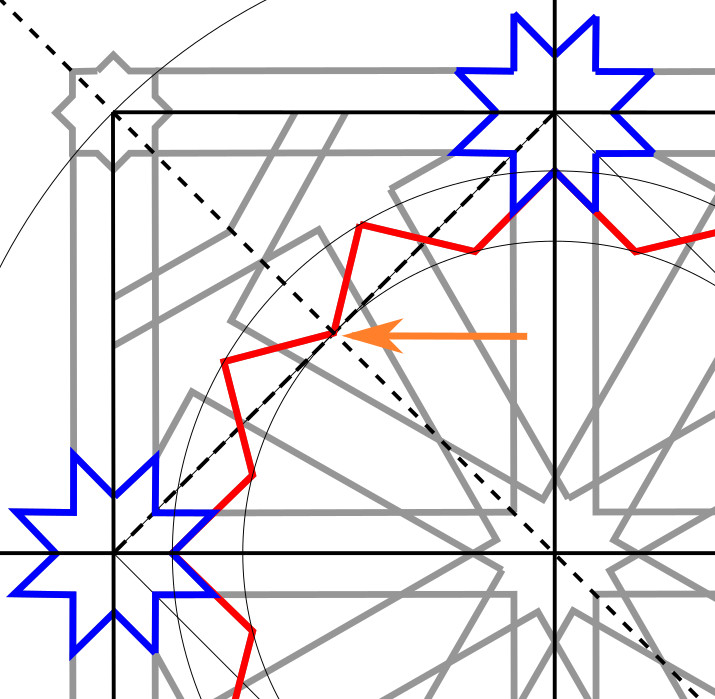
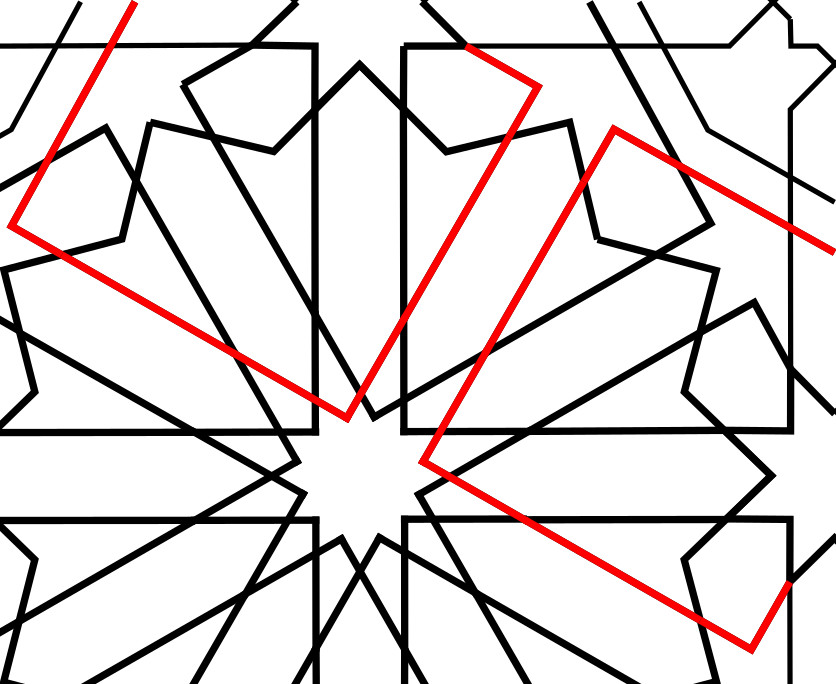
Constructing the lines in the corners
In the corners we need construction lines for what I think of as the “wings,” (in red below) and the octagon (in blue).
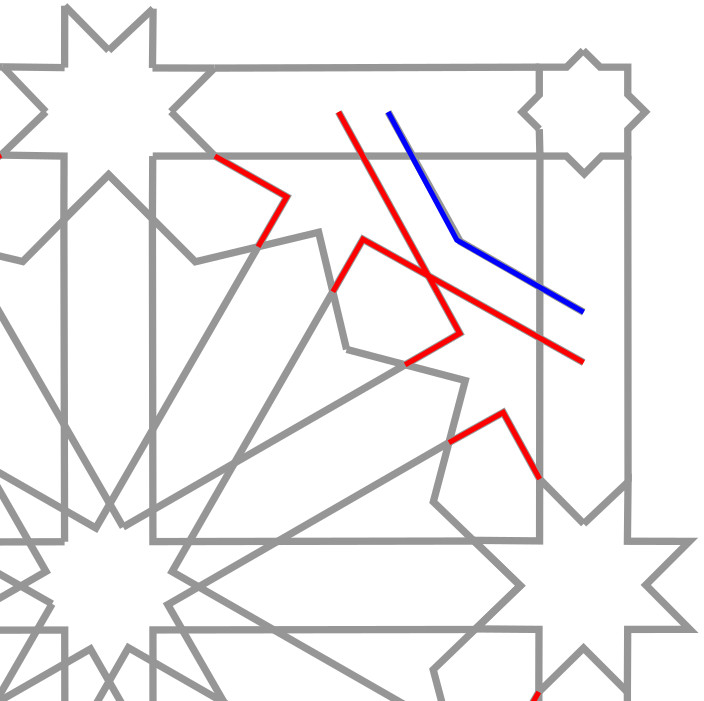
“Wings” (red) and octagon (blue)
Both the pattern at tilingsearch.org, and the photograph from the Wade archive, suggest that these lines are extensions of lines in the adjacent stars.

This makes sense—everything in the pattern should be at 0, 30, 45, 60 0r 90°—and these lines falling on one of those headings makes them parallel to other arms of the star, and produces the pleasing square motifs that catch your eye.
It also means the channel in the octagon is half the width of the main channels, which seems like a nice relationship.
But, I find it a little mathematically creepy that a line extended from a {12/5} star should hit the vertex of an {8/3} star on the border of the next pattern. Would it really?
Let’s construct the triangle XYZ as seen below, spanning two adjacent full patterns. We’re curious about the angle θ, which should be 30°. If we can determine the lengths of the two legs of this right triangle, h and t, we can compute the ratio t/h and compare it to the tangent of 30°. We should get:

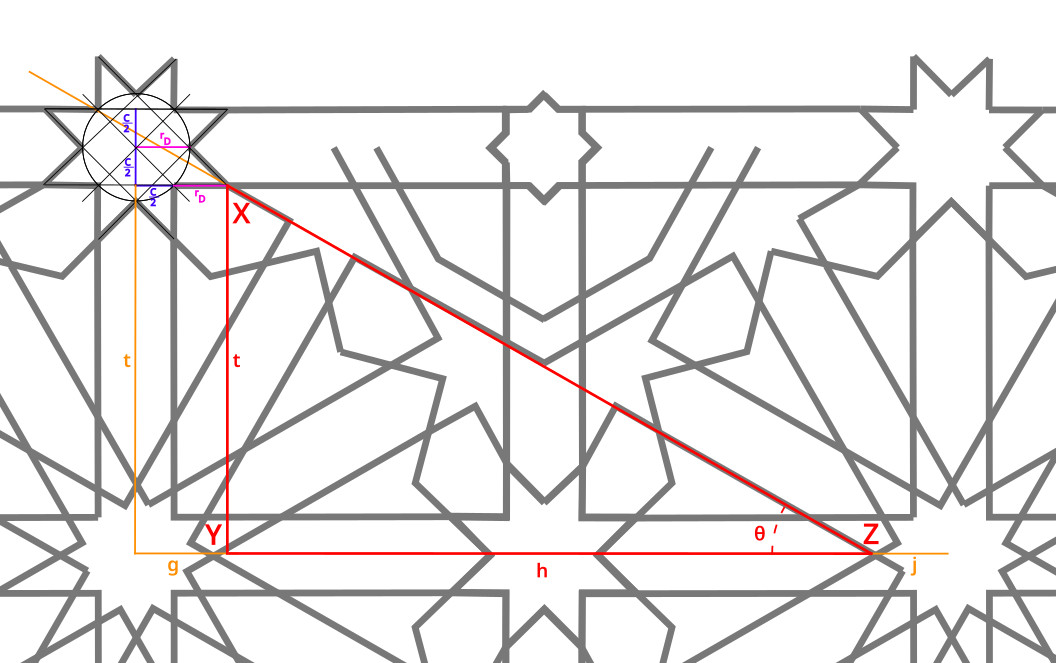
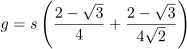
First we’ll calculate h, the horizontal leg of the triangle between vertex Y and vertex Z. The distance between two pattern centres is s, so

Calculation of g is straightforward. Vertex X is at the point of the {8/3} star, so

Bearing in mind the definition of rD we worked out above,

If s = 1, g is about 0.114237.
Calculating j is a bit more involved. We start by noting that vertex Z falls on the circle inscribed in the {12/5} star, which we can call Circle E. So j is the radius of Circle E (rE) .

From the discussion of outward step stellation above, we know that if Circle E is the circle inscribed in the {12/5} star, it is also the circle circumscribing the {12/4} star. Because there are specific ratios between successive stellations, we can get the radius of Circle E (rE) if we first get the radius of the circle inscribed in the {12/4} star, Circle F. We’ll call its radius rF.

The {12/4} star was generated in the first place by the intersecting channels of width C, so we can see that rF is closely related to C.

And then it remains to figure out the relationship between the inscribing and circumscribing circles for a {12/4} star. The key point is that a {12/4} star has inner vertex angles of 60°.


Hence

That’s a surprising and elegant relationship, that Circle E, which is never drawn but is readily apparent to the eye, has the channel width as its radius.
Now we can calculate h:


That’s ugly! But it’s usable. If s = 1, h is about 0.790911.
The other leg of the triangle is of length t:

So, bearing in mind the definition of C above, we have
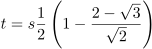
If s = 1, t is about 0.452633.
If we divide t by h, we get
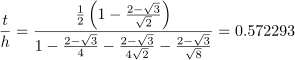
We were hoping for the tangent value of 30°, or 0.577350. Instead we get 0.572293, which turns out to be the tangent value for an angle of 29.78°. Just a hair shy of 30°.
In other words, if you extend the channel line from an adjacent star, a line that really is at 30° to the horizontal, it would come in a bit high for the vertex X in the diagram above: 3.5 mm high in a pattern where s, the side length, is 100 cm.
Although I was pretty picky above, on the difference between 14.4775° and 15°, here I’m going to say that this angle difference (29.78° vs. 30°) is close enough for practical purposes — given that in the real world materials are coarse, and geometric pattern lines typically have significant thickness. Introducing a tiny “course correction” as the construction line crosses the boundary between adjacent patterns, a correction of about half a degree, is not going to be noticeable. It helps that the channel line does not extend to the pattern boundary, so you don’t see the course correction.

Hence in Phase 3 I created the construction lines in the corners by connecting the tip of one of the mid-side {8/3} stars to a specific intersection where the master square meets one side of a channel.
Conclusion
Well, it’s probably time to wrap up this overly long post. If you are here, thanks for reading to the end! It might not hurt of someone double-checked my math…

One thought on “The Mathematics of the Pattern on the Sala de la Barca Ceiling”